Masks
Apply edits to only part of a photo. Create an area by painting it with a brush, by making a shape mask whose edge gradually fades (linear · radial · rectangle), by selecting similar colors at once (Magic select), or by automatically selecting parts such as the sky, people or faces (Auto select). Then adjust exposure, contrast, color and blacks separately for each area.
When to use it
- When the sky in a beach photo is blown out to white and the clouds don't show — darken just the sky (Auto select, linear)
- When you want to brighten just the face by one step in a backlit photo — radial
- When you want to brighten or darken just a rectangular area, such as a window, a picture frame or a monitor — rectangle
- When you want to adjust only a large area of similar color, such as red clothing or a yellow wall — Magic select
- When you want to darken just the background, or warm up just the person — Auto select (Person · Background)
- When you want to make just the lips a richer color, or just the hair glossier — Auto select (Lips · Hair)
- When, after applying a filter, you want to deepen the blacks of just part of the photo, such as the hair or pupils — Black depth · Neutralize blacks in a mask
- For small, fiddly areas that shapes can't fit — paint with the brush and refine with the eraser
Where to find it
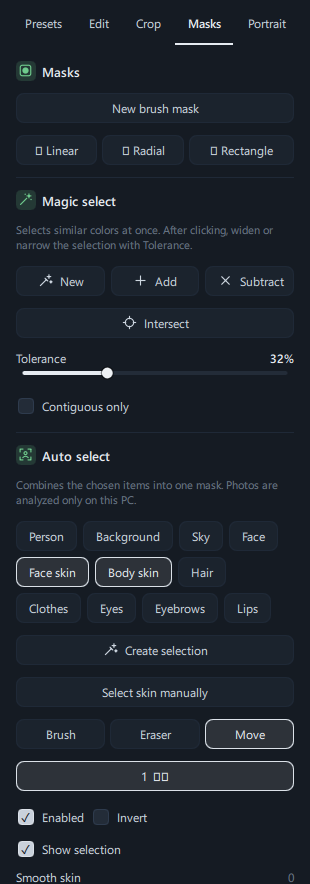
It's on the Masks tab at the top right of the editor (tab order: Presets · Edit · Crop · Masks · Portrait).
The right panel contains, from top to bottom:
- Masks
New brush mask, + Linear · + Radial · + Rectangle
- Magic select
New · Add · Subtract, Intersect, Tolerance, Contiguous only
- Auto select
11 part buttons, Create selection, Select skin manually
Brush · Eraser · Move (Size · Softness while painting)
- Mask list
The masks you've created, shown with a number and a name (up to 8)
- Adjustments for the selected mask
Enabled · Invert · Show selection, the adjustment sliders, Delete selected mask
Sliders and buttons
Common actions such as double-clicking a slider to return it to the default and clicking the number field to type a value are explained in Editor overview. You can type values into the number fields of mask sliders too, and double-clicking the name or the slider returns it to the default.
Creating masks
| Name | What it does | On the photo |
|---|---|---|
| New brush mask | Creates a new mask by painting it directly with the brush. Clicking it switches straight to the brush. | Where you paint becomes the mask. Your first stroke creates a "Brush mask", and later strokes are added to the same mask. |
| + Linear | A band-shaped mask that starts at one side and gradually fades out. | Drag from where you press the mouse button → to where you release it. It's strongest at the press point and fades out toward the release point. |
| + Radial | A round (elliptical) mask that's strongest in the center and fades toward the outside. | Where you start dragging becomes the center, and the distance you drag sets the width and height (dragging diagonally sets both at once). |
| + Rectangle | Like radial, but a rectangle with rounded corners. Use it for rectangular areas such as windows, picture frames and screens. | Same as radial. |
- When you click a shape button, "Drag to set the area · Esc to cancel" appears in the panel. Drag over the photo to create the mask.
- You can create up to 8 masks per photo. Once you have 8, the create buttons are dimmed.
Shape mask handles
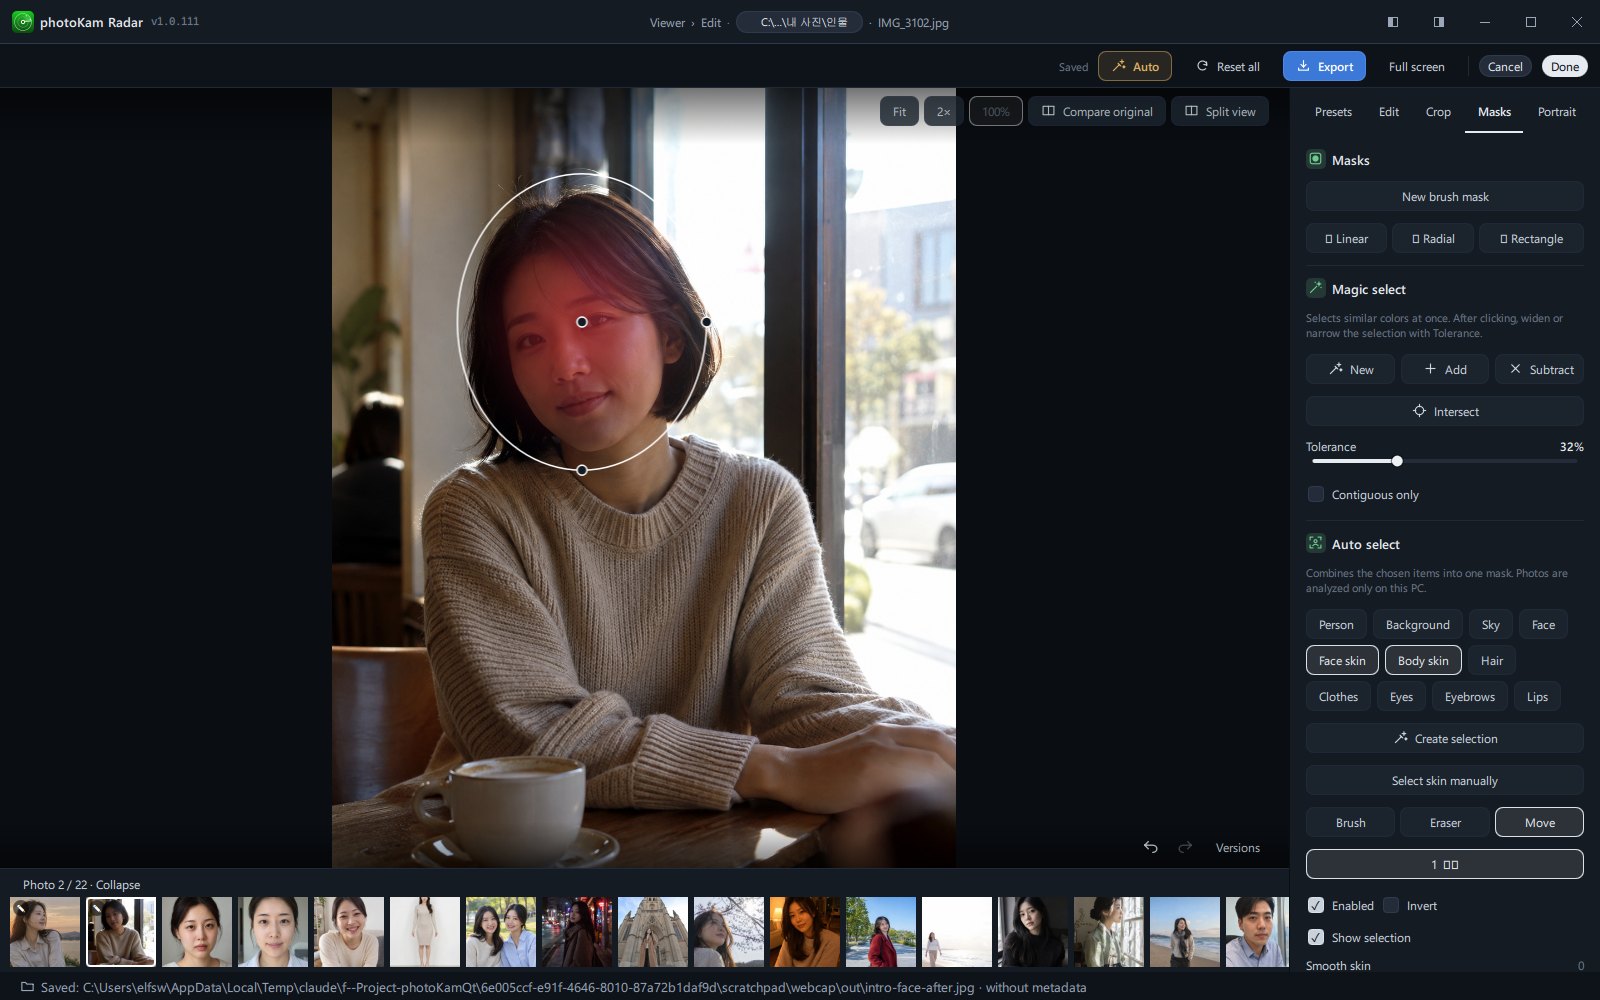
White lines and handles appear only on the shape mask selected in the list.
| Mask | Handles | Dragging them |
|---|---|---|
| Linear | 2 end handles, 1 center handle | End handles: change the direction and length. Center handle: moves the whole mask. |
| Radial · Rectangle | Horizontal end handle, vertical end handle, center handle | Horizontal/vertical end handles: change only the size in that direction. Center handle: moves the mask. To tilt it, use the Angle slider below. |
- The white outline of radial and rectangle masks is the outer limit of the effect. The effect fades gradually from the inside toward that outline.
- Dragging anywhere other than a handle moves a zoomed-in photo. You can also move it by dragging with the mouse wheel button (middle button) held down.
Magic select
The panel description: "Selects similar colors at once. After clicking, widen or narrow the selection with Tolerance."
| Name | Range | Default | What it does |
|---|---|---|---|
| New | Click | — | Click it, then click the photo to create a new mask ("Magic select N") from areas similar to that color. While it's on, further clicks are added to that mask. |
| Add | Click | — | Adds colors similar to the clicked spot to the currently selected mask. |
| Subtract | Click | — | Removes colors similar to the clicked spot from the currently selected mask. |
| Intersect | Click | — | Keeps only the part of the currently selected mask that overlaps the clicked color. Parts that don't overlap that color are removed. |
| Tolerance | 0–100% | 32% | Sets how different a color can be and still count as the same color. Higher values pick up more. You can widen and narrow the selection you just clicked with this slider as often as you like (while "The selection you just clicked is still adjustable …" is shown). |
| Contiguous only | On · Off | Off | When off, similar colors that aren't connected to the clicked area are picked up too, all at once. When on, only the area connected to the clicked spot is picked up. |
- Add · Subtract · Intersect are available only when a mask is selected in the list. Using them on a shape mask turns it into a painted area (pixel mask), and from then on you refine its shape with the brush and eraser instead of the handles.
- When Magic select is on, the cursor becomes a crosshair and a hint such as "Click a color to select …" appears in the panel. To finish, click the same button again or press Esc.
Auto select
The panel description: "Combines the chosen items into one mask. Photos are analyzed only on this PC."
| Part button | Area selected |
|---|---|
| Person | The whole person |
| Background | Everything that isn't a person |
| Sky | The sky. It's found by color and brightness, so areas that resemble the sky, such as white walls, may get mixed in. If so, remove them with the eraser. |
| Face | The face |
| Face skin | The skin of the face (excluding the eyes, eyebrows and lips) |
| Body skin | Skin on the body, such as the neck and arms |
| Hair | The hair |
| Clothes | Clothing |
| Eyes · Eyebrows · Lips | That part of the face |
| Name | What it does |
|---|---|
| Part buttons (11) | Click to turn them on and off. Turning on several combines them into one mask. At first, Face skin · Body skin are on. |
| Create selection | Finds the parts you turned on and creates a mask (named after the selected parts, such as "Auto: Sky"). If none are on, it shows Choose items above. While analyzing, it changes to Cancel analysis. |
| Select skin manually | Drag as with a radial mask to create a "Smooth skin" mask (Smooth skin 50) where you want it. |
- The result is shown as a message below the button: "Analyzing the photo on this device…" → "Selected Sky. Check the selection." or "Selected. Not found: Eyes". Facial parts such as the face, eyes and lips are created only when a face is found in the photo.
- Masks created with only Face skin · Body skin selected come with Smooth skin 50 already applied. You can retouch skin in more detail on the Portrait retouching tab.
- Masks that don't include Face · Face skin · Eyes · Eyebrows · Lips (for example, sky, background, hair or clothes) come with Feather 10 already applied so the edge doesn't look abruptly cut off. When facial parts are included, Feather is 0 so the areas around the eyes and mouth aren't filled in.
Painting and erasing with the brush
| Name | Range | Default | What it does |
|---|---|---|---|
| Brush | Click | — | Adds to the selected mask where you paint. Painting on a shape mask turns it into a painted area (pixel mask). |
| Eraser | Click | — | Removes where you paint from the selected mask. |
| Move | Click | Selected | Ends painting and returns to the default state (dragging shape handles, moving the photo). |
| Size | 4–240 px | 60 px | The diameter of the brush circle. A circular cursor of the same size appears over the photo. |
| Softness | 0–100% | 60% | Sets how softly the brush edge spreads. At 0, the edge is sharp. |
- While you paint, the panel shows "Drag with the middle button held to pan · Esc to finish". Drag with the mouse wheel button held down to move the photo, and press Esc to stop painting. What you've already painted stays.
- The brush and eraser are available only when a mask is selected in the list (to paint a new one, use New brush mask).
Per-mask adjustments (sliders)
Click a mask in the list to show that mask's adjustments below. The list shows a number and a name, such as "1 Auto: Sky", and masks that are turned off get " · Off" after their name.
| Name | Range | Default | What it does |
|---|---|---|---|
| Enabled | On · Off | On | Turns this mask's adjustments on and off. Use it to compare briefly without deleting the mask. |
| Invert | On · Off | Off | Swaps inside and outside. Inverting a mask that selects a person adjusts only the background. |
| Show selection | On · Off | On | Shows the selected mask's area covered in red on the photo. It's hidden briefly while you drag a slider and never appears in exported files. |
| Smooth skin | 0–100 | 0 | Smooths the skin inside the area. While it's getting ready, it's dimmed and locked and "Preparing skin retouching…" is shown. |
| Exposure (EV) | −5.00–5.00 | 0.00 | The brightness of the area (1 is one stop). |
| Contrast | −100–100 | 0 | The contrast of the area. |
| Highlights | −100–100 | 0 | Adjusts only the bright parts inside the area. To recover clouds in a blown-out sky, lower it toward −. |
| Shadows | −100–100 | 0 | Adjusts only the dark parts inside the area. |
| Whites | −100–100 | 0 | Adjusts the brightest end inside the area. |
| Blacks | −100–100 | 0 | Adjusts the darkest end inside the area. |
| Temperature | −100–100 | 0 | The − side makes it cooler; the + side makes it warmer. |
| Tint | −100–100 | 0 | Shifts toward green on the − side and toward purple on the + side. |
| Vibrance | −100–100 | 0 | Makes colors stronger or paler, mainly the pale ones. |
| Saturation | −100–100 | 0 | Makes all colors evenly stronger or paler. |
| Black depth | 0–100 | 0 | Pulls the darkest parts inside the area down to true black. It's added to the value in the DEEP BLACKS panel on the Edit tab. → Deep Blacks |
| Neutralize blacks | 0–100 | 0 | Removes teal or brown tints in the dark parts inside the area to make clean blacks. This value is also added to the DEEP BLACKS panel value. |
| Feather | 0–100 | Shapes 100 · painted masks 0 | Sets how soft the edge is. See the explanation of feather in "Good to know" below. |
| Opacity | 0–100 | 100 | The strength of all of this mask's adjustments. At 50, half of each slider value is applied. |
| Angle | −180.0–180.0 | 0.0 | Tilts radial and rectangle masks (shown only for these two). |
| Delete selected mask | Click | — | Deletes the selected mask. You can bring it back with Ctrl+Z. |
Step by step
1. Recover a blown-out sky — Auto select (Sky)
- Open the Masks tab.
- Turn on only Sky in Auto select
Click Face skin · Body skin, which are on from the start, to turn them off, then click Sky.
- Click Create selection
After "Analyzing the photo on this device…" appears, "Auto: Sky" is added to the list and the sky in the photo is covered in red.
- Check and refine the picked-up area
If white walls or bright sand that aren't sky got mixed in, click Eraser and paint over them to remove them. If parts of the sky were missed, paint them in with the Brush.
- Darken the sky
Lower Exposure (EV) to −0.5 to −1.0 and Highlights toward − to bring out the clouds. To make it bluer, move Temperature toward − and Vibrance toward +.
Turn off Show selection and check the result. The red overlay isn't included in the result.
2. Gradually darken just the top of the sky — Linear
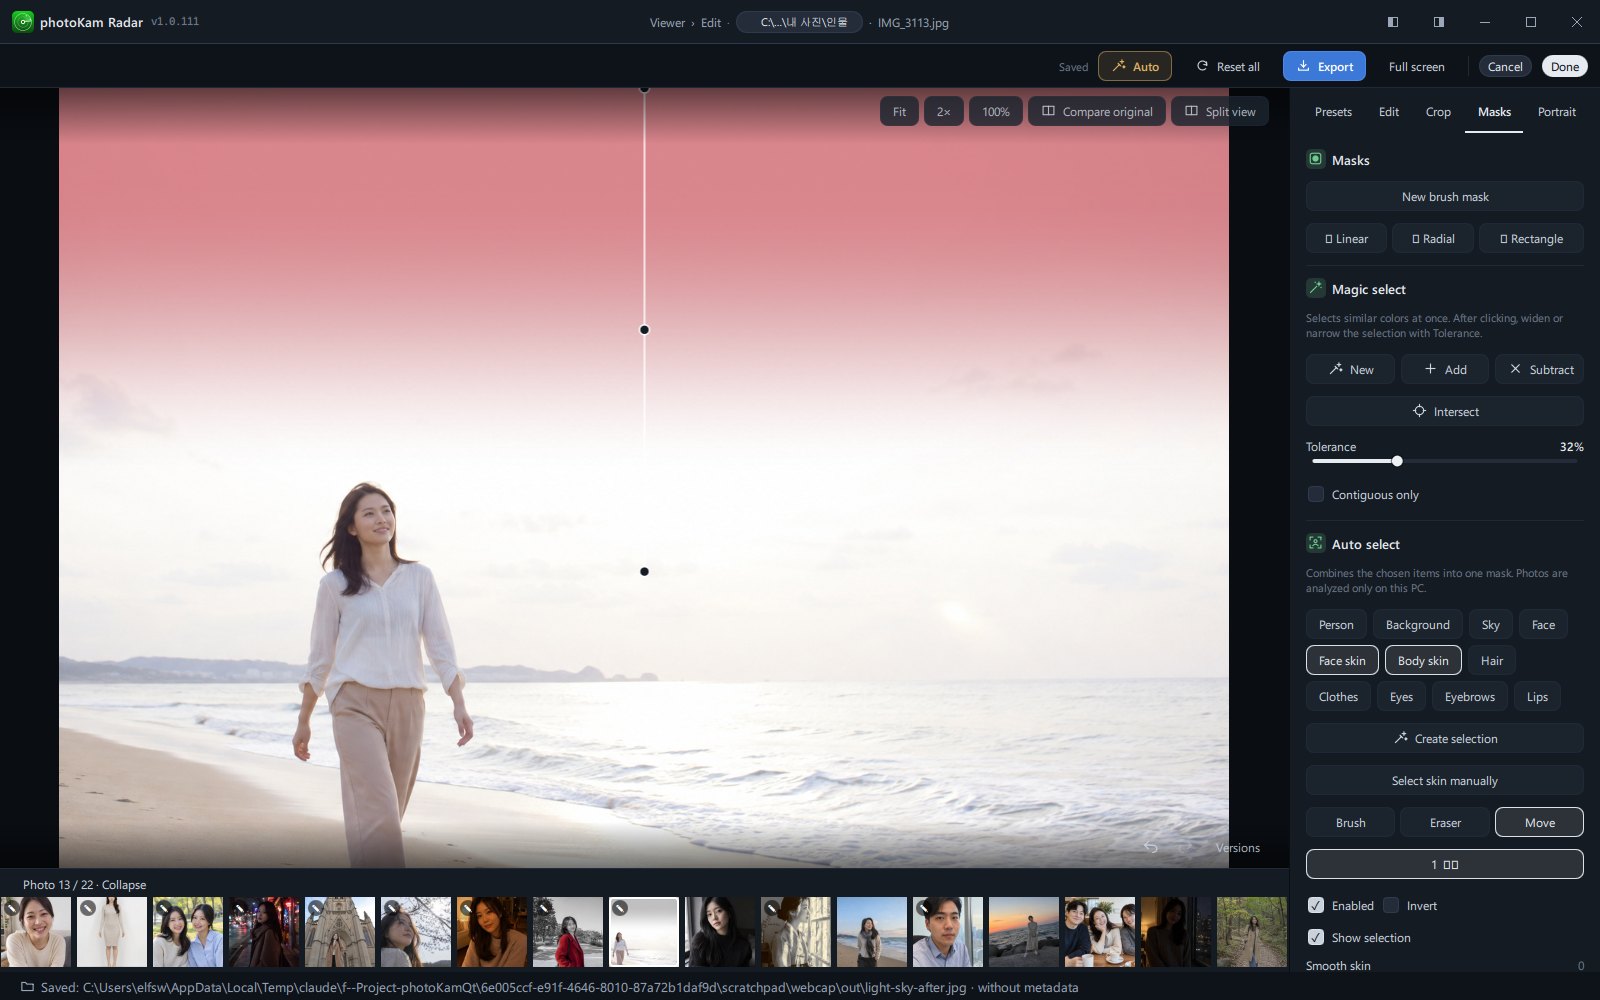
- Click + Linear.
- Drag down from the top of the photo to near the horizon and release the mouse button
A band appears that's strongest at the top and fades out where you released.
- Lower Exposure (EV) toward −
The sky darkens naturally from the top down (as if you'd put a filter on the lens).
- Refine with the handles
Drag the end handles to change the length and angle, and the center handle to change the position. If the horizon is tilted, move an end handle to tilt the band with it.
To make the transition sharper, lower Feather — the effect is divided more sharply around the center handle.
3. Brighten just a shaded face — Radial
- Click + Radial.
- Drag diagonally outward from the center of the face
An ellipse covering the face appears.
- Raise Exposure (EV) to +0.3 to +0.7
Only the face gets brighter, and the background outside the window stays as it is.
- Fit the shape
Use the horizontal/vertical end handles to match the size of the face, and if the head is tilted, tilt the mask with Angle.
- If it looks unnatural, raise Feather and lower Opacity
The edge becomes softer and the effect subtler.
- (Optional) Darken just the background
Create another mask and turn on Invert to adjust only outside the ellipse.
4. Brighten just a window — Rectangle
- Click + Rectangle and drag from the center of the window toward a corner.
- Fit it to the window frame with the horizontal/vertical end handles, and if it's at an angle, tilt it with Angle.
Lower Feather to around 30 to reduce spill outside the window frame.
Lower Highlights toward − and adjust Exposure (EV) to bring out the view outside the window.
5. Adjust just a red coat — Magic select
- Click New
The cursor becomes a crosshair.
- Click the coat once
Similar red areas are covered in red, and "Magic select 1" is created.
- Drag Tolerance to adjust it
Raise it until the shaded folds are picked up too, and lower it if lips or signs get picked up. As long as it's the selection you just clicked, you can change it as often as you like.
If separate areas got picked up too, turn on Contiguous only, or click Subtract and click those areas.
For areas that were missed, click more while New is on, or add them with Add.
End Magic select with Esc and adjust just the coat with Saturation · Exposure (EV) and so on.
6. Paint it yourself — Brush
- Click New brush mask
A circular cursor appears over the photo.
- Set Size · Softness and paint
Painted areas appear red. The brush size is based on the screen, so zooming in on the photo lets you paint smaller areas.
- Paint over any spill with the Eraser to remove it.
Click Move or press Esc to stop painting, then adjust with the sliders.
- Soften the edge
Raising Feather on a painted mask spreads its edge outward.
7. Deepen the blacks of just part of the photo after a filter — Blacks in a mask
- First set the preset and blacks on the Edit tab
For example: the "Overcast Film" preset → the Deep Blacks panel.
- Create a mask on the Masks tab
For hair, use Hair in Auto select; for the area around a person, use + Radial.
- Raise Black depth
Only the grayish blacks inside the area become deep black. This value is added to Black depth on the Edit tab.
- If the dark areas have a teal or brown tint, raise Neutralize blacks too.
Result
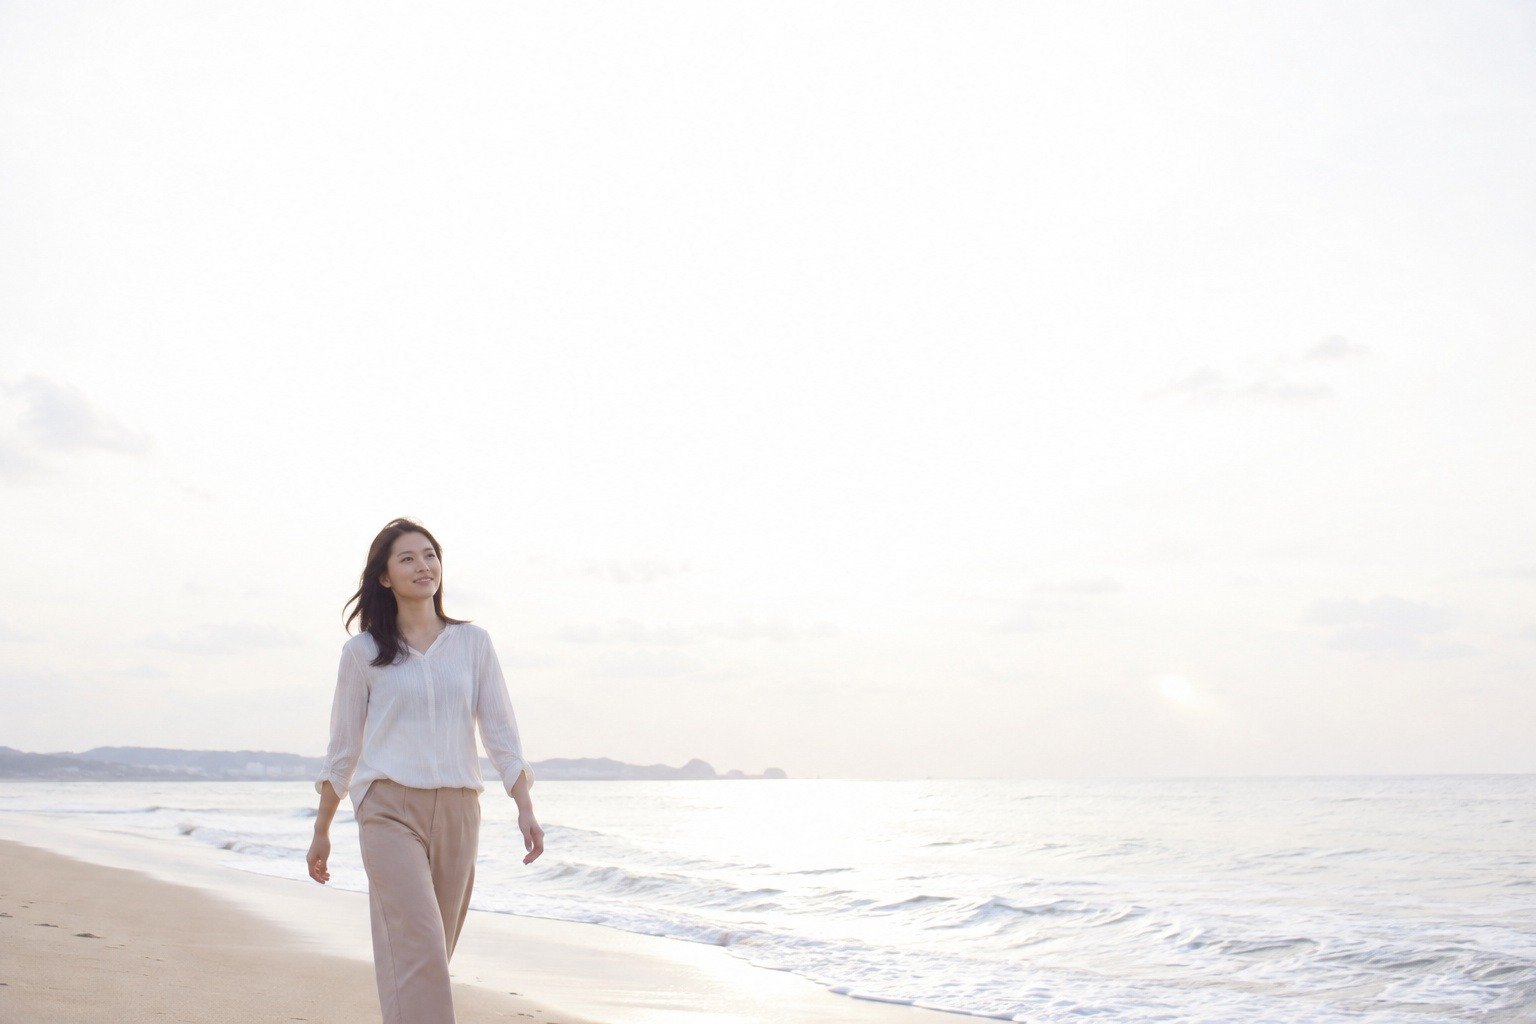
 BeforeAfter
The texture of the clouds and the blue come back to the sky that was blown out to white, while the brightness of the person and the sea stays the same.
The people in the sample photos were generated by AI.
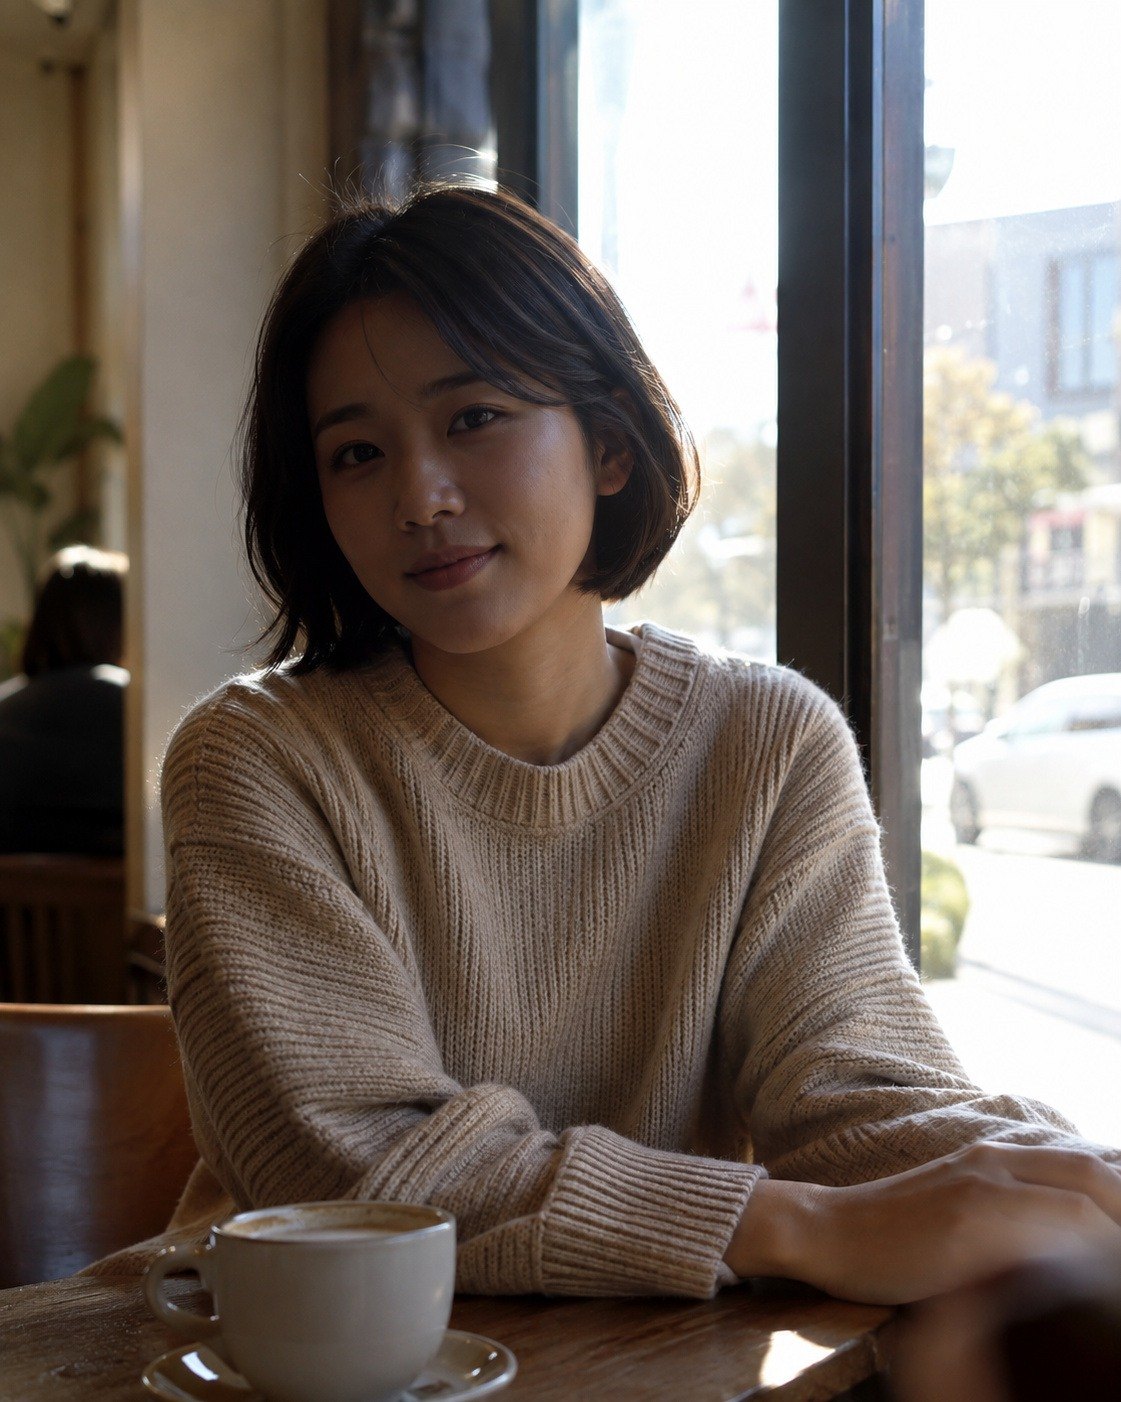
 BeforeAfter
Only the face, which was a stop too dark, gets brighter, and the bright view outside the window doesn't blow out to white.
The people in the sample photos were generated by AI.
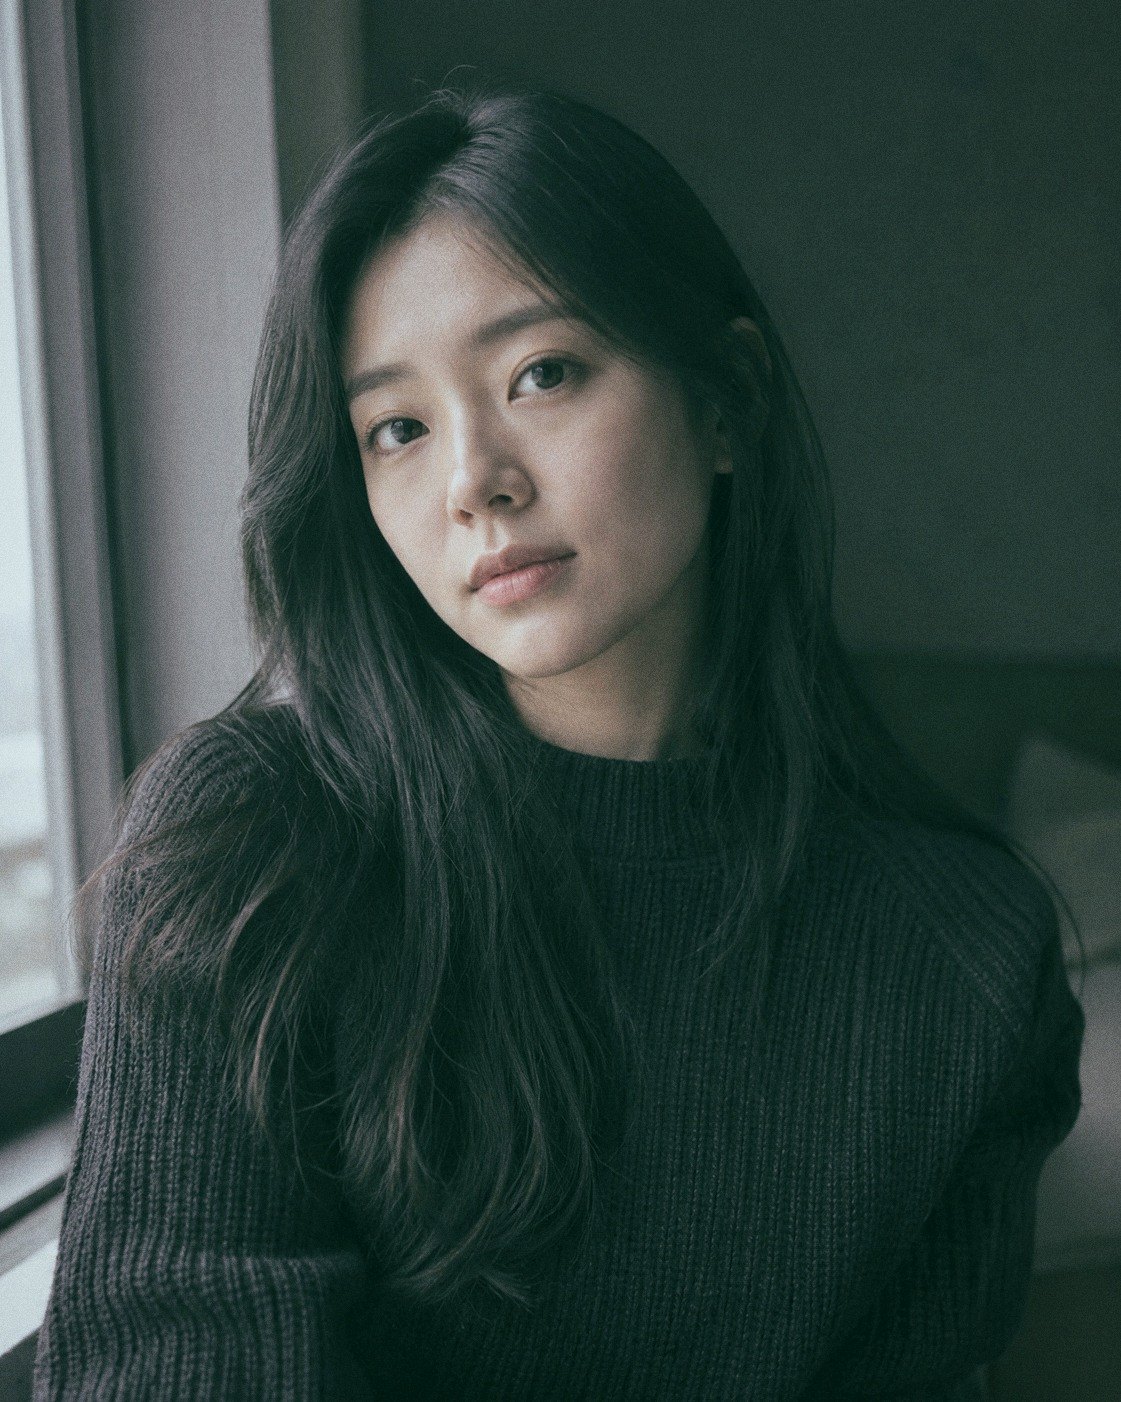
 BeforeAfter
The hair, eyes and dark knit that had turned gray because of the filter become deep black only inside the mask, while the soft tones of the background stay as they were.
The people in the sample photos were generated by AI.
Good to know
- A mask only defines an area. After you create a mask, the photo changes only when you move the sliders below.
- Feather (edge softness) means something slightly different for each mask type.
- Linear: at 100, it fades evenly from the start point to the end point; the lower it is, the shorter the transition around the center handle. At 0, it cuts off sharply at the center handle.
- Radial · Rectangle: at 100, it fades gradually from the center to the white outline; the lower it is, the more the inside keeps the full effect and fades only near the outline. At 0, it cuts off sharply at the outline.
- Painted masks (Brush · Magic select · Auto select): spreads the edge outward. 100 is the widest (about 2% of the photo's long side).
- Where several masks overlap, their values add up. For example, if two masks both have exposure +0.5, the overlap gets +1.0 brighter. Sliders with a range of −100 to 100, such as contrast or color, don't exceed ±100 even when combined.
- A mask's Black depth and Neutralize blacks are added to the values in the DEEP BLACKS panel on the Edit tab. If the Edit tab value is 30 and the mask value is 40, that area behaves as if 70 were applied (never more than 100). Outside the mask, the Edit tab value applies as is.
- The brush size is based on the screen. When you zoom in on the photo, the same brush paints a smaller part of the photo. Zoom in to paint fine details.
- Painting on a shape turns it into a painted mask. Using the brush or eraser, or Magic select's Add · Subtract · Intersect, on a shape mask turns it into a painted area (pixel mask): the handles disappear, and Feather switches to the painted-mask behavior. If you plan to refine the shape further, finish that before painting.
- Masks are fixed to their original positions in the photo. Even if you crop or rotate later, the masks follow along and don't end up in the wrong place. → Crop · Rotate · Perspective
- The selection overlay (red) is visible only in the editor and never appears in exported files. It's hidden briefly while you drag a slider so you can see the result more easily. Even with several masks (up to 8), the area of the selected mask is shown in red.
- Auto select analyzes photos only on this PC. Your photo is never sent anywhere. If the analysis takes too long, you can stop it with Cancel analysis. If the photo or edits change during analysis, "Analysis cancelled. If the photo or edits changed, try again." appears, so click again.
- Undo — Creating a mask, a single painted stroke and a single slider drag are each one Ctrl+Z step.
- Masks in Paste edits is off by default. If you turn it on and paste to another photo, masks are placed in the same position (relative to the photo size), so on photos with a different composition or aspect ratio they may land in a different place. → Editor overview
- Adjust overall color and brightness on the Edit tab first, then use masks to refine parts of the photo afterward. That makes the work easier.
Frequently asked questions
The mask create buttons are dimmed and can't be clicked.
Either there are already 8 masks, or you're editing a video. Select a mask you don't need in the list and delete it with Delete selected mask. In Auto select, the message "You can create up to 8 masks. Delete an existing mask and try again." appears in this case.
I created a mask, but the photo is unchanged.
A mask only defines an area. Move a slider below, such as Exposure (EV). If it's still unchanged, check whether Enabled is off or Opacity is 0.
Auto-selecting the sky also picks up white walls or white clothing.
That's because the sky is found by color and brightness. Paint over those areas with the Eraser to remove them, or click that color with Magic select's Subtract.
I get "The selected parts weren't found in this photo."
The selected part isn't in the photo or is too small. The face, eyes and lips can be found only when a face is visible in the photo. Try creating the mask yourself with the brush or a radial mask.
Magic select says "No area to select was found at that point."
There's no area of similar color around the spot you clicked. Click somewhere else, or raise Tolerance and click again.
Does the red overlay show up in exported photos?
No. It's only a marker that shows the selected area. If it bothers you, turn off Show selection.
I want to darken just the background.
Create a mask with Background in Auto select, or create one with Person and turn on Invert. Both give the same result.
The mask edge looks hard, as if cut with a knife.
Raise Feather. This is especially common with painted masks, whose default feather is 0.
I want to smooth skin — should I use a mask?
The skin items on the Portrait retouching tab are more detailed and easier to use. Use Smooth skin in a mask when you want to define the exact area yourself.