Presets · Reference photos
Change the mood of a photo with a single click. Preview 35 built-in presets — from airy Japanese looks and cinematic tones to film, vintage and black and white — as they'd look on your current photo, and pick one. Save edits you like as your own presets to apply to other photos or share as files. If you have a photo with the mood you're after, the reference photo feature matches its brightness and color to your current photo.
When to use it
- When a photo looks flat and you want to quickly compare several looks to see what suits it.
- When you want dozens of travel photos to share the same color look (save it as your own preset and apply it photo by photo).
- When you want to match the same mood as a photo you saw on social media or one you edited the way you liked before (reference photo).
- When you want to send your edits to a friend or move them to another PC (exporting and importing presets).
- When you want a black and white with more depth than simply removing the color (Black & White category).
Where to find it
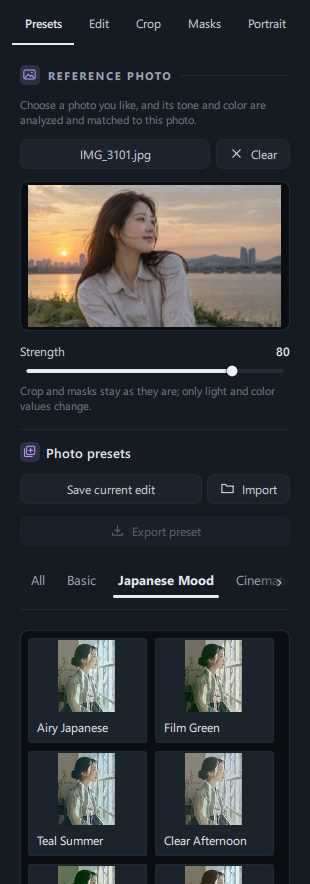
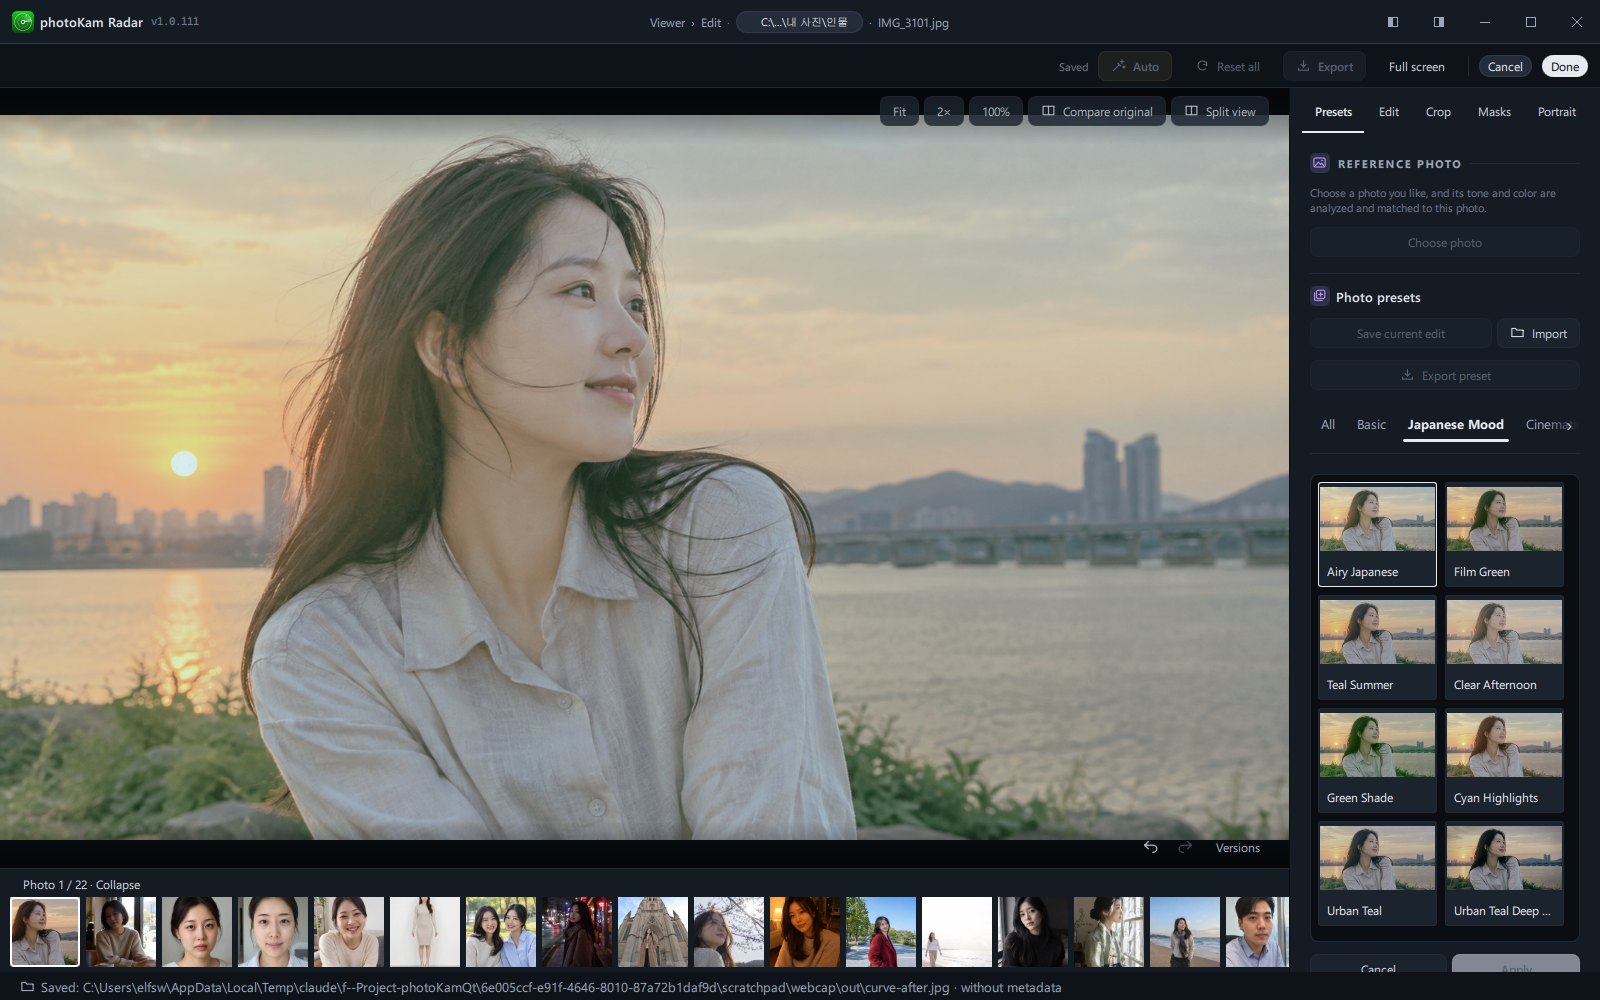
It's Presets, the first tab in the right panel of the editor (tab order: Presets · Edit · Crop · Masks · Portrait).
From top to bottom, it contains:
- REFERENCE PHOTO
a one-line hint, the Choose photo button (plus a Clear button once a photo is chosen), a thumbnail of the chosen photo, and the Strength slider
- Photo presets
Save current edit · Import · Export preset
- Category tabs
All · Basic · Japanese Mood · Cinematic · Film · Vintage · Portrait · Landscape · Black & White · My Presets
- Preset list
Thumbnails in two columns, each showing a small preview of that preset applied to the current photo, with its name
Cancel · Apply at the bottom
Reference photo
Choose a photo you like, and its brightness and color (the brightness levels of its highlights and shadows, its warm or cool feel, its overall saturation and the saturation of each color) are analyzed, and the light and color values are adjusted so that your current photo gets closer to that feel. In the words of the panel's hint: "Choose a photo you like, and its tone and color are analyzed and matched to this photo."
| Name | Range | Default | What it does |
|---|---|---|---|
| Choose photo | — | — | Choose a photo in the "Choose a reference photo" window (JPG · PNG; the window opens in the folder of the current photo). While it's analyzing, the button shows Analyzing…; when it's done, the button shows the chosen file name. |
| Thumbnail | — | — | The chosen reference photo is shown small below the button. You can adjust the strength while comparing it with the current photo. |
| Strength | 0–100 | 100 | At 100, the result is closest to the reference photo; the closer to 0, the closer it is to the original photo without light and color edits. |
| Clear | — | — | Returns the light and color values changed by the reference photo to the values from before you chose it, and clears the reference photo. |
What changes — Exposure · Contrast · Highlights · Shadows · Whites · Blacks · Temperature · Tint · Vibrance · Saturation · COLOR MIXER. What doesn't change — As the panel's note says, "Crop and masks stay as they are; only light and color values change." Tone curve, detail, effects, lens and portrait retouching don't change either.
- When you choose a reference photo, values matched to it replace the light and color values you'd adjusted up to then. That's why we recommend applying the reference photo first and then fine-tuning exposure and so on.
- Each slider adjustment can be undone with one press of Ctrl+Z.
- When you move to another photo, the reference photo is cleared (values already changed stay as they are).
- If you're previewing a preset, end the preview with Cancel or Esc, then click Choose photo.
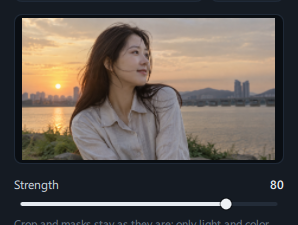
Photo presets
Category tabs
| Tab | Presets included | Count |
|---|---|---|
| All | All built-in presets and your own presets | 35 + your presets |
| Basic | Five basic presets for light edits | 5 |
| Japanese Mood | Airy, pale Japanese film tones with hints of green and teal | 15 |
| Cinematic | Movie-like teal and orange tones | 5 |
| Film · Vintage | The feel of film photos or faded old prints | 2 |
| Portrait · Landscape | Presets suited to the light at different times of day and to the subject | 4 |
| Black & White | Deep black and white, and tinted black and white | 4 |
| My Presets | Presets you saved or imported | Shown only when you have at least one preset of your own |
- The selected tab's text becomes bold and underlined.
- If the panel is too narrow to show all the tabs in one row, scroll the mouse wheel over the tabs or drag them to move sideways. You can also click ‹ · › at either end.
- If there are many presets, scroll up and down within the list.
Full list of built-in presets
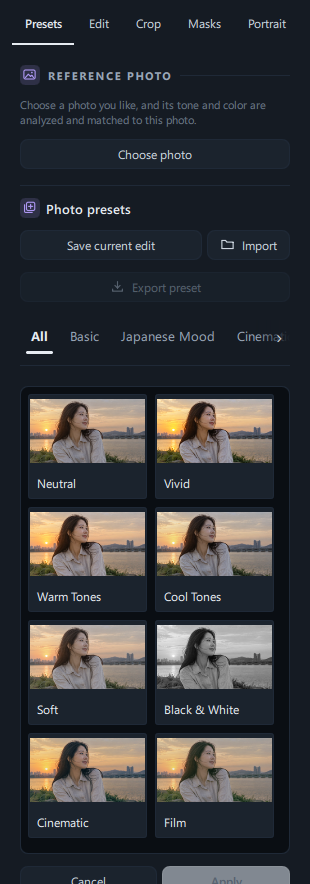
The thumbnail previews show the preset applied to the photo you're editing now, not a sample photo. On the All tab, they appear in the order below (Basic → Black & White → Cinematic → Film → Portrait · Landscape … → Japanese Mood). The "Effects" column in the tables lists effects included in addition to light and color (vignettes always darken the edges).
Basic (5)
| Name | Look | Effects |
|---|---|---|
| Neutral | Sets light · color · color mixer · black & white · color grading all to 0 — a clean starting point with presets stripped away | — |
| Vivid | Slightly brighter, with more contrast and saturation for a crisp, rich look | — |
| Warm Tones | A little brighter, with a warmer temperature | — |
| Cool Tones | A little more contrast, cooler colors and slightly lower saturation | — |
| Soft | Brighter, with lower contrast and saturation for a soft, pale look | — |
Black & White (4)
| Name | Look | Effects |
|---|---|---|
| Black & White | Red · orange · yellow (skin) lighter and the sky (blue) darker — a black and white with more depth than simply removing the color | — |
| Noir | A dramatic black and white with strong contrast and a very dark sky | — |
| Sepia | An old photo look with brown and golden tones over black and white | — |
| Cold B&W | A black and white with a bluish cast and a slightly lighter sky | — |
Cinematic (5)
| Name | Look | Effects |
|---|---|---|
| Cinematic | Blues shifted toward teal, skin (orange) kept, and blacks slightly lifted for a matte look — teal shadows, warm highlights | — |
| Cinematic Warm | The same movie tone, warmer | — |
| Cinematic Cool | The same movie tone, cool and blue | — |
| Cinematic Fade | A faded movie tone with strongly lifted blacks and lower saturation | — |
| Teal & Orange | A strong movie tone contrasting teal shadows with orange skin and highlights | — |
Film · Vintage (2)
| Name | Look | Effects |
|---|---|---|
| Film | The feel of a film photo with lower contrast and lifted blacks — greenish shadows, yellowish highlights | — |
| Vintage | A faded old photo with muted, warm colors and lifted blacks | — |
Portrait · Landscape (4)
| Name | Look | Effects |
|---|---|---|
| Golden Hour | Warm, like golden light at sunset | — |
| Blue Hour | A calm blue, like the blue hour after sunset | — |
| Portrait | Slightly lower contrast, highlights pulled down and shadows lifted for softness, with bright, radiant skin | — |
| Landscape | More contrast and vibrance, with deep, rich greens and blues | — |
Japanese Mood (15) — Airy Japanese film tones that raise exposure and lower contrast for a bright, hazy look, tinting the shadows green and the highlights teal.
| Name | Look | Effects |
|---|---|---|
| Airy Japanese | The basic style — bright, hazy teal with green shadows | Lower clarity |
| Film Green | Film-like green shadows and yellowish highlights | Grain |
| Teal Summer | Teal sky and sea with cool shadows | — |
| Clear Afternoon | The brightest, haziest style, with brighter skin | Lower clarity |
| Green Shade | Deeper green shadows, a calm overcast day | Grain |
| Cyan Highlights | Layered with teal highlights and orange shadows | Grain |
| Urban Teal | Cool, subdued streets with teal shadows | Clarity |
| Urban Teal Deep Shadow | Urban Teal colors with deeper shadows | Clarity · Vignette |
| Urban Teal Classic | Urban Teal colors with strong contrast and deep blacks | Clarity · Vignette · Grain |
| Urban Teal Low-Key | A mood where the whole photo is darkened and subdued | Clarity · Dehaze · Vignette |
| Urban Teal Noir | A dark tone with the strongest contrast and heavily muted colors | Clarity · Vignette · Grain |
| Urban Teal Cine | Movie-like teal shadows and warm highlights | Clarity · Vignette |
| Forest Walk | Yellow leaves shifted toward green, fresh greens and teals | Lower clarity |
| Seaside Town | Clear aqua and blue, bright teal | Grain |
| Overcast Film | A heavily muted, overcast teal film look with coarse grain | Grain · Vignette |
Preview and apply
- Hover over a preset thumbnail, and the large photo changes to show that preset applied (a preview). That thumbnail's outline changes to the highlight color. Nothing has been applied yet.
- Click a thumbnail to select that preset. Even if you hover over another thumbnail and move away, the preview returns to the preset you selected.
- The photo changes only when you click Apply at the bottom. Apply becomes active once a preset is selected.
- To cancel, click Cancel or press Esc. Moving to another tab or changing the category also ends the preview.
What changes when you apply a preset
| Group | When you apply a built-in preset |
|---|---|
| Light — Exposure · Contrast · Highlights/Shadows · Whites/Blacks | Changes to the preset's values. Items not in the preset become 0. |
| Color — Temperature · Tint · Vibrance · Saturation | 〃 |
| Color Mixer · Black & white · Color Grading | 〃 (Black & white is turned off unless it's a black-and-white preset) |
| Effects — Grain · Vignette · Clarity · Dehaze | Only those included in the preset change. Effects not included keep their current values. |
| Other — Tone curve · Deep Blacks panel · Detail (Sharpening · Noise reduction) · Lens corrections · Color targets · Look (LUT) · Crop · Masks · Portrait retouching | Stay as they are. |
- A preset doesn't add to your current values — it overwrites them. That's why we recommend applying a preset first and then adjusting exposure, highlights and so on to suit the photo.
- If you don't like it, press Ctrl+Z once to go back to before you applied it.
Save current edit — creating your own presets
Saves the current photo's edits as your own preset. Click Save current edit to open the "Save current edit as preset" window.
| Item | Description |
|---|---|
| Preset name | The name shown in the list (up to 80 characters). If left empty, the preset isn't saved. |
| Description (optional) | A note (up to 500 characters). It's saved in the preset file too. |
| Light · Exposure, contrast, highlights/shadows, whites/blacks | Checked by default. Saves the light values and Black depth · Neutralize blacks from the DEEP BLACKS panel. |
| Color · Temperature, tint, vibrance, saturation, HSL | Checked by default. Saves Temperature, Tint, Vibrance and Saturation, plus COLOR MIXER · COLOR TARGETS · Black & white · COLOR GRADING. |
| Effects · Vignette, grain, sharpening, noise, clarity | Checked by default. Saves Vignette (including the midpoint), Grain, Sharpening, Noise reduction, AI denoise, Clarity, Texture and Dehaze. |
At the bottom of the window is the note "Only the checked items are saved in the preset. Applying a preset never changes crop or rotation." When you click Save, the My Presets tab appears (the first time you save), and the new preset is added at the end of that tab and of the All tab.
- What isn't saved — Tone curve, Look (LUT), lens corrections, crop · rotation · perspective, repair (spot removal), masks and portrait retouching.
- Checked groups are saved even if their current values are 0. So when you apply that preset, those groups change to exactly the saved values. For example, to make a preset that changes only color, uncheck Light and Effects before saving.
- If you leave the name empty or uncheck all three groups, the preset isn't saved and the message "Check the name and the adjustment groups to save." appears.
- You can save up to 128 presets of your own.
- Use Save current edit after you've finished previewing presets.
Import
Click Import and choose a preset file (.json) in the "Import preset" window to add it to My Presets. Each file contains one preset.
| If you see this message | Cause |
|---|---|
| This preset has already been imported. | You've already imported the same preset. |
| Unsupported version or invalid values. … | It isn't a preset file exported from photoKam Radar, or the file is damaged. |
| You can save up to 128 presets. | Your presets are full. |
Export preset
You can save your own preset as a file (.json) to move it to another PC or send it to someone else.
- On the My Presets tab, click the preset you want to export (Export preset becomes active only when a preset is selected).
- Click Export preset and choose where to save it and the file name in the "Export preset" window.
- The recipient opens the file with Import.
- To pass along a built-in preset, apply that preset, create your own preset with Save current edit, and export that.
- "Processing preset…" appears briefly while it's being processed.
Step by step
Change the mood with a preset
- Open the editor
In the full view, click Edit and open the Presets tab in the right panel.
- Choose a category
For an airy, fresh feel, click Japanese Mood; for a movie-like feel, click Cinematic.
- Preview
Move the mouse over the thumbnails and watch how the large photo changes. The thumbnail previews also show your current photo.
- Select and apply
Click a preset you like, then click Apply.
- Readjust the blacks
Film and Japanese Mood presets deliberately lift the blacks for a hazy look. For deeper blacks, click Auto in the DEEP BLACKS panel on the Edit tab (Deep Blacks).
- Fine-tune
Many Japanese Mood presets raise exposure, so in bright photos the sky may blow out to white. Lower Exposure or Highlights a little on the Edit tab.
Match a mood with a reference photo
- Click Choose photo under REFERENCE PHOTO at the top of the Presets tab.
- In the "Choose a reference photo" window, choose the photo whose look you want (JPG · PNG).
- After Analyzing… appears briefly, the light and color of your current photo move closer to the reference photo. A thumbnail of the reference photo appears below the button.
- Adjust Strength while comparing the thumbnail and the large photo. If the effect is too strong, lower it to around 60–80.
- Then, if needed, fine-tune exposure and so on on the Edit tab.
- To go back to the starting state, click Clear. The light and color values return to what they were before you chose the reference photo.
Create your own preset and apply it to several photos
- Edit one photo the way you like it (light, color, effects).
- Click Save current edit on the Presets tab and enter a name (for example, "Summer Trip"). Check the groups to save and click Save.
- Click the next photo in the filmstrip at the bottom of the editor, or move to it with Ctrl+→ (or PgDn).
- On the My Presets tab, click the preset you just created and click Apply.
- Adjust just the exposure a little for each photo.
(To apply edits to many photos at once, Copy edits · Paste edits is faster — Editor overview)
Send a preset to a friend
- On the My Presets tab, click the preset you want to send.
- Click Export preset and choose where to save it and the file name (for example,
summer-trip.json). - Send that file by email or a messaging app.
- The recipient opens the file from the Presets tab → Import in the photoKam Radar editor.
Result
 BeforeAfter
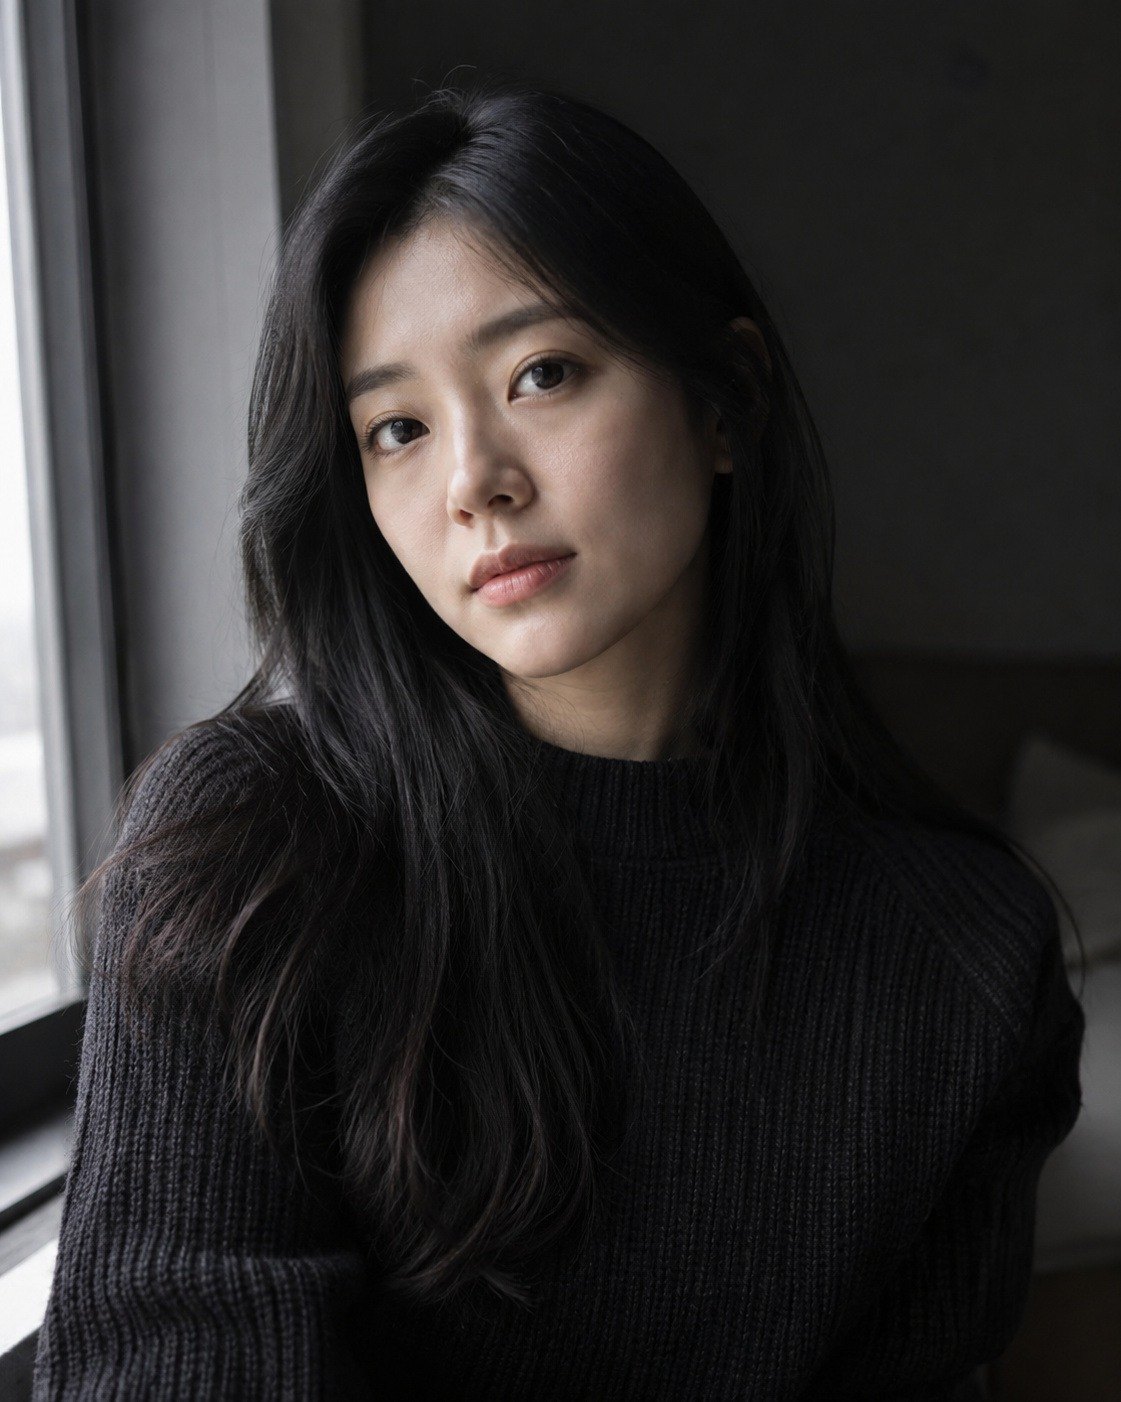
An overcast teal film tone is added along with coarse grain and a light vignette. With only the preset applied, the darkest areas float as gray, but Auto in the Deep Blacks panel deepens the blacks of the hair and knit again. For this photo, the Deep Blacks panel's auto adjustment set Black depth to 24 and Neutralize blacks to 64 (darkest area 18/255 → 2/255).
The people in the sample photos were generated by AI.
 BeforeAfter
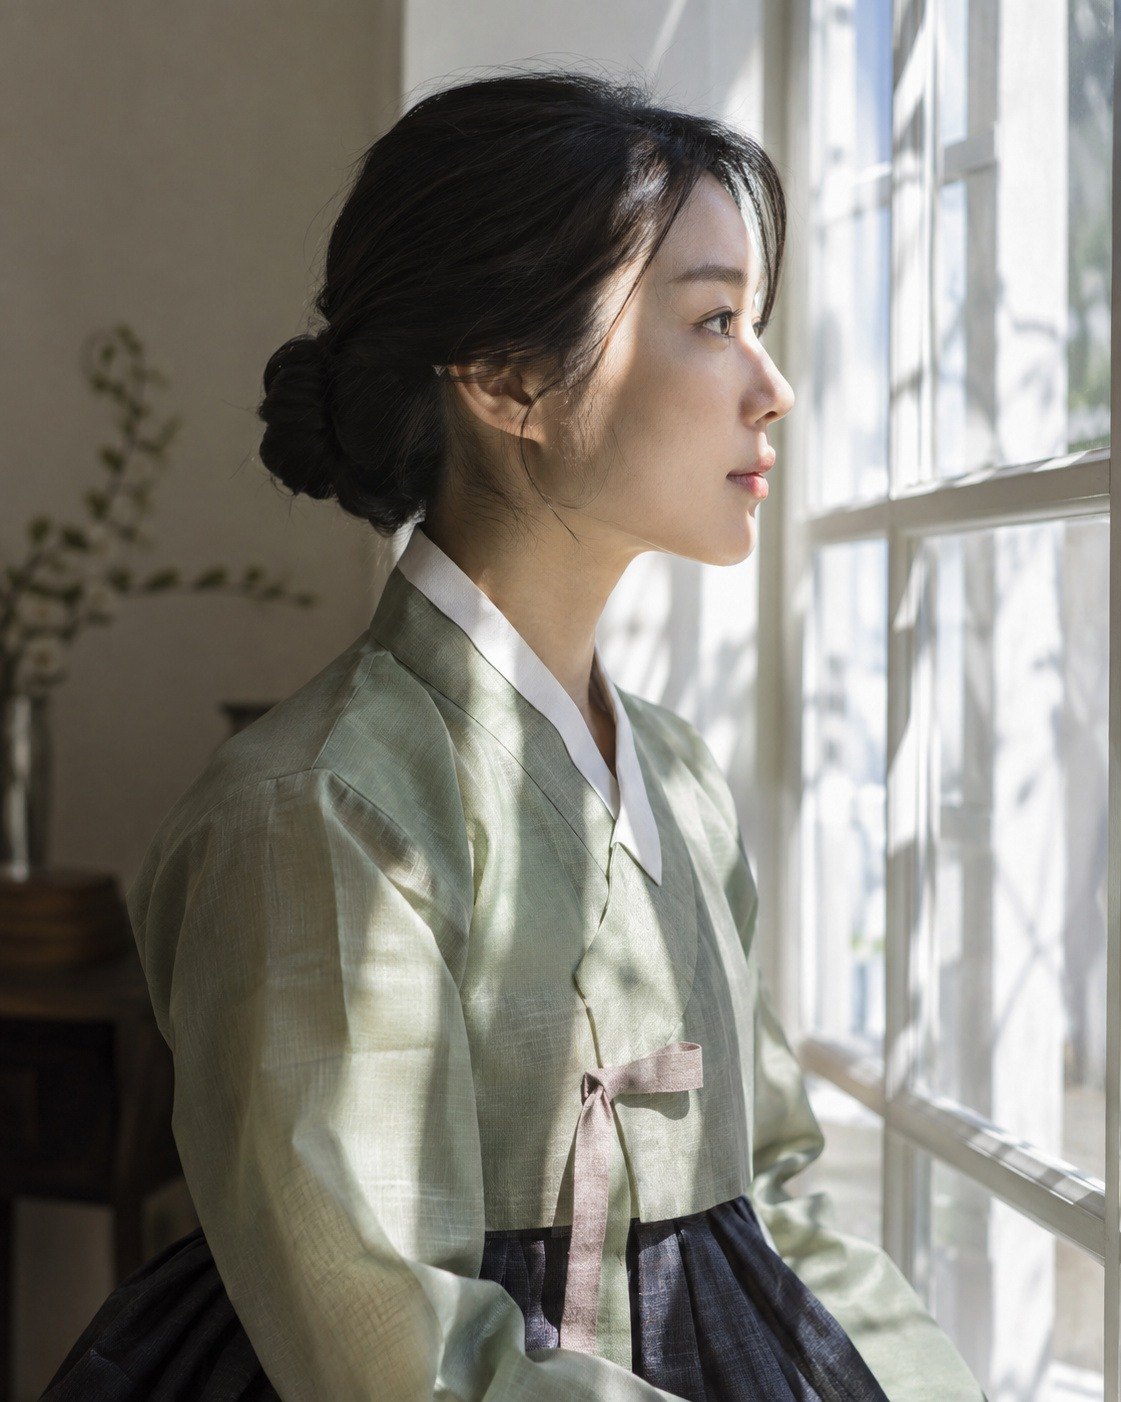
Unlike black and white made by simply removing the color, the skin stays light and the bluish areas of the background stay dark, giving the photo depth.
The people in the sample photos were generated by AI.
 BeforeAfter
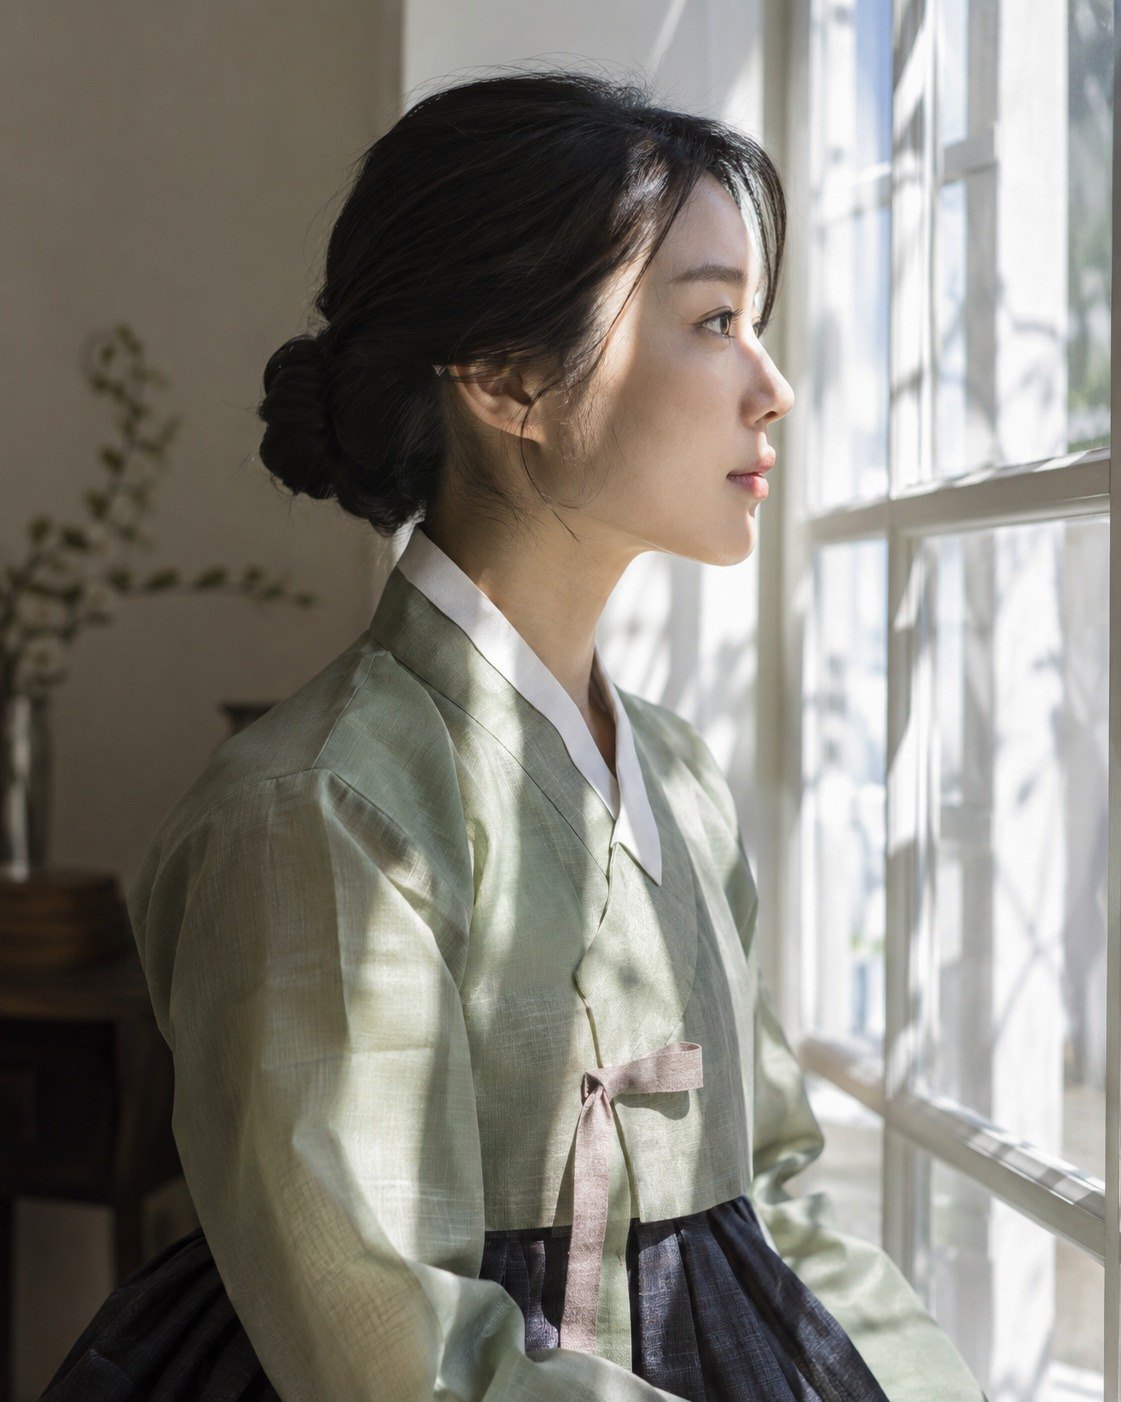
The indoor window photo takes on the warm light and colors of the riverside sunset photo. Crop, masks and portrait retouching stay as they are. Matching photos with very different brightness (a dark interior ↔ a bright sunset) can make black hair float as gray. In that case, lower Strength.
The people in the sample photos were generated by AI.
Good to know
- The original stays untouched. Presets and reference photos also change only the edit values and never touch the original file.
- Presets overwrite values. Built-in presets replace light, color, color mixer, black & white and color grading wholesale with the preset's values. We recommend applying a preset first and then fine-tuning.
- Reset just light and color with Neutral. When you want to return only light and color to 0 while keeping crop, masks and portrait retouching, apply Neutral (effects, tone curve and detail stay as they are).
- Check the blacks after applying a preset. Many Film, Cinematic and Japanese Mood presets lift the blacks for a matte look. If you like, readjust the blacks at the end with Auto in the DEEP BLACKS panel.
- Portrait retouching, crop and masks aren't included in presets. They stay as they are when you apply a preset, and they aren't saved when you save your own preset.
- Reference photos are calculated for each photo. Even with the same reference photo, values are calculated to suit the current photo, so when matching several photos to the same mood, choosing the reference photo again for each one is the most accurate. If you want to reuse the values from one photo as is, create your own preset with Save current edit.
- If you applied a preset after a reference photo — Clicking Clear in that state returns light and color to the values from before you chose the reference photo, so the light and color changed by the preset are reverted too.
- Moving your presets to another PC — Your presets are saved in this PC's app data. To use them on another PC, move them with Export preset → Import.
Frequently asked questions
I clicked a preset, but the photo didn't change.
Clicking a preset only selects it. The photo changes only when you click Apply at the bottom. If the preview disappeared, you moved to another tab or category, which ended the preview.
Applying a preset made the exposure I'd adjusted disappear.
Built-in presets overwrite light and color values with the preset's values. Undo with Ctrl+Z, then apply the preset first and readjust the exposure.
I don't see the My Presets tab.
It appears only when you have at least one preset of your own. Create one with Save current edit or Import, and the tab appears.
I can't click Export preset.
Click to select one of your own presets first, and it becomes active. To export a built-in preset, save it as your own preset first.
Are tone curves and looks (LUTs) saved in presets too?
No. Your presets save only three groups: Light, Color and Effects. To carry the tone curve over to other photos too, use Copy edits · Paste edits (the curve is included in the Light group).
Importing shows "Unsupported version or invalid values".
Choose a .json file created with Export preset in photoKam Radar. This message also appears if the file's contents were edited by hand and the values don't fit.
Can I use a RAW file as a reference photo?
Yes — export it as JPG first, then choose that file. Reference photos are chosen from JPG and PNG files.
I cleared the reference photo, but the photo isn't the same as at the start.
Clear returns only the light and color values changed by the reference photo to what they were before you chose it. Other values you changed afterward (effects, tone curve and so on) stay as they are.
I moved to another photo and back, and the reference photo is gone.
The reference photo is cleared when you move to another photo. Values already changed remain.
Does the preview look the same as the result after applying?
Yes, they use the same values. The preset thumbnail previews also show that preset applied to the current photo.