Full view
Double-click a photo to view it large, filling the screen. You can zoom in up to 16× with the wheel, check where the camera focused and which parts are blown out to white, and flip through the photos in the same folder with the filmstrip at the bottom. In folders with a mix of RAW and JPG, you can choose to view All · RAW · JPG, and slideshows and editing also start from here.
When to use it
- When you zoom in to check and choose the photo that's in focus among similar shots (focus point display).
- When you check how much of a photo is blown out to white, such as the sky or white clothes (overexposure warning).
- When you want to flip through only RAW or only JPG in a folder where you shot both.
- When you want to check shooting information, the histogram and where the photo was taken while looking at the photo.
- When you want to view a folder's photos as a slideshow with music.
- When you want to edit a photo you like right away.
Where to find it
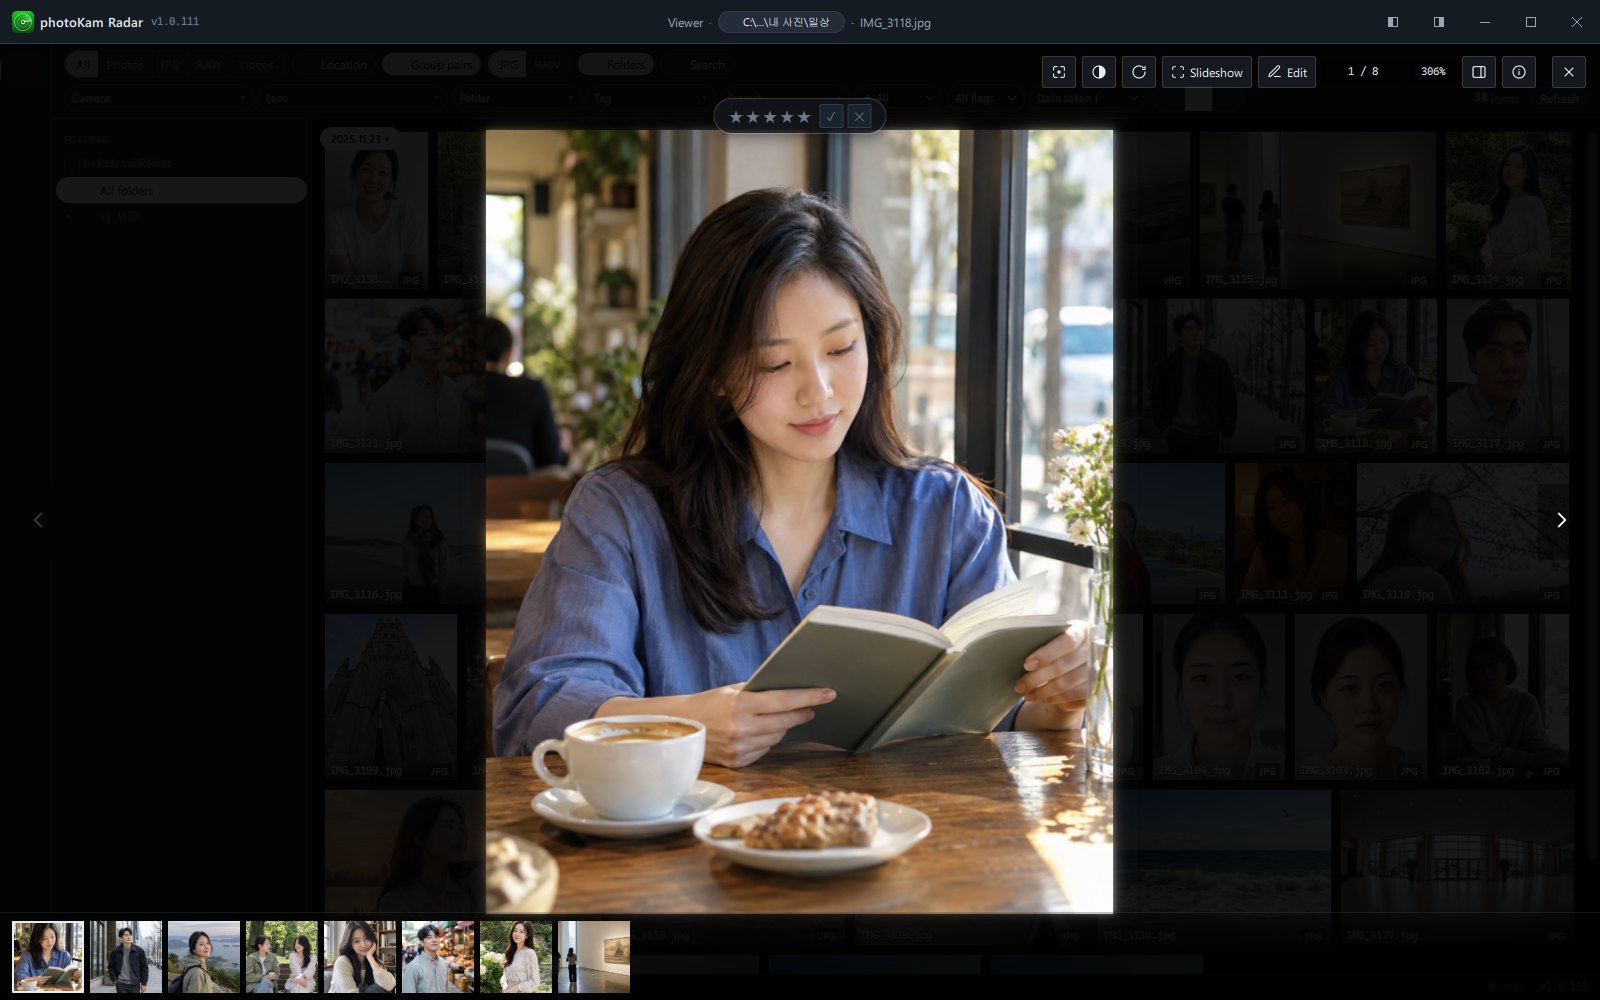
- Double-click a photo in the gallery, or select a photo and press Enter.
- Click the preview image in the details, or choose 🔍 Open full view from the right-click menu.
- Click a blue pin (a single photo) on the map (Jump to date · Map).
The full view opens as a screen covering the area below the top bar. The middle of the top bar shows Viewer, a folder chip and the file name.
Buttons and menus
Screen layout
| Position | Contents |
|---|---|
| Top left | All · RAW · JPG. Shown only in folders containing both RAW and photos in other formats (or while filtering) |
| Top center | Rating ★ · flag ✓ ✕ buttons (move to the bottom of the panel when the inspector panel is on) |
| Top right | Tool buttons (see the table below) |
| Center | The photo. A blurred thumbnail is shown first until the original has loaded |
| Middle of both sides | Large ‹ · › buttons (Previous (←) · Next (→)). Dimmed at the beginning or end |
| Middle right | Minimap (only when zoomed in) |
| Bottom | Filmstrip. Photos in the same folder (shown when there are 2 or more) |
| Right column | Inspector panel (analysis · information; toggle with Tab · H) |
Tools at the top right (from the left)
| Button | Shown when | What it does |
|---|---|---|
| Show JPG file / Show RAW file | There's a RAW+JPG pair of the same shot | Switches to the file in the other format of the same shot (RAW⇄JPG). Goes back when you move to the next photo |
| View: RAW original / View: Camera preview | RAW photos | RAW original: converts and shows the original data you shot (looks the same as in the editor, with brightness and lens corrections matched to how the camera rendered it). Camera preview: the small JPEG the camera stored inside the file (fast, but may look a little different from the editor). Each click switches between them, and your choice is saved |
| Focus point (F) (icon with four corners + a center dot) | Photos | Shows where the camera focused as rectangles (F). See "Focus point" below |
| Highlight clipping warning (half-filled circle icon) | Photos | Marks blown-out areas with stripes. If 0.05% or more is blown out, the percentage (for example 0.8%) is also shown on the button |
| Rotate (↻) | Photos | Rotates 90° clockwise. The original file stays as it is; the rotation is saved as an edit (90° rotation) and the photo gets the Edited mark (see "Good to know" below) |
| Rotate + Apply | Videos that can be rotated | Preview the rotation first; it's written to the file only when you Apply it (Video) |
| Slideshow | Always (dimmed if there's only one photo) | Plays this list full screen, advancing automatically (S). See "Slideshow" below |
| Edit / Edited | Photos | Goes to the editor inside the app (Editor). For a photo that has already been edited, it shows Edited in the accent color |
| External editor | Videos | Opens the video in an external video editor |
n / N | 2 or more photos | Shows which photo in this list you're on |
Zoom % | Photos | Current size relative to the original pixels (… while loading) |
| Panel (analysis · information) | Always | Inspector panel — histogram, EXIF, map, rating (Tab/H). Whether it's on or off is saved |
| Info (i) | While the panel is off | Shows a shooting information panel at the top right (I) |
| ✕ | Always | Close (Esc). Returns to the gallery |
Top left — All · RAW · JPG
| Button | What it does |
|---|---|
| All | Same as the gallery (follows the gallery's type and Group pairs settings) |
| RAW | Only the RAW files in this folder |
| JPG | Only photos that aren't RAW (JPG, PNG and so on) |
- When you switch, you move to the file in the other format with the same name as the shot you were viewing (for example
0A4A6739.JPG→0A4A6739.CR3). If there's no such file, you move to the nearest photo in name order. - Your choice is saved and stays the same the next time you use the full view. In a folder without that type, only that folder is shown as All, and if you've just switched, "No RAW photos in this folder — showing all" (or JPG) is shown briefly.
- The filmstrip at the bottom of the editor has the same buttons. If you switch while editing, your current edits are saved and you continue editing the file in that format of the same shot.
Actions on the photo
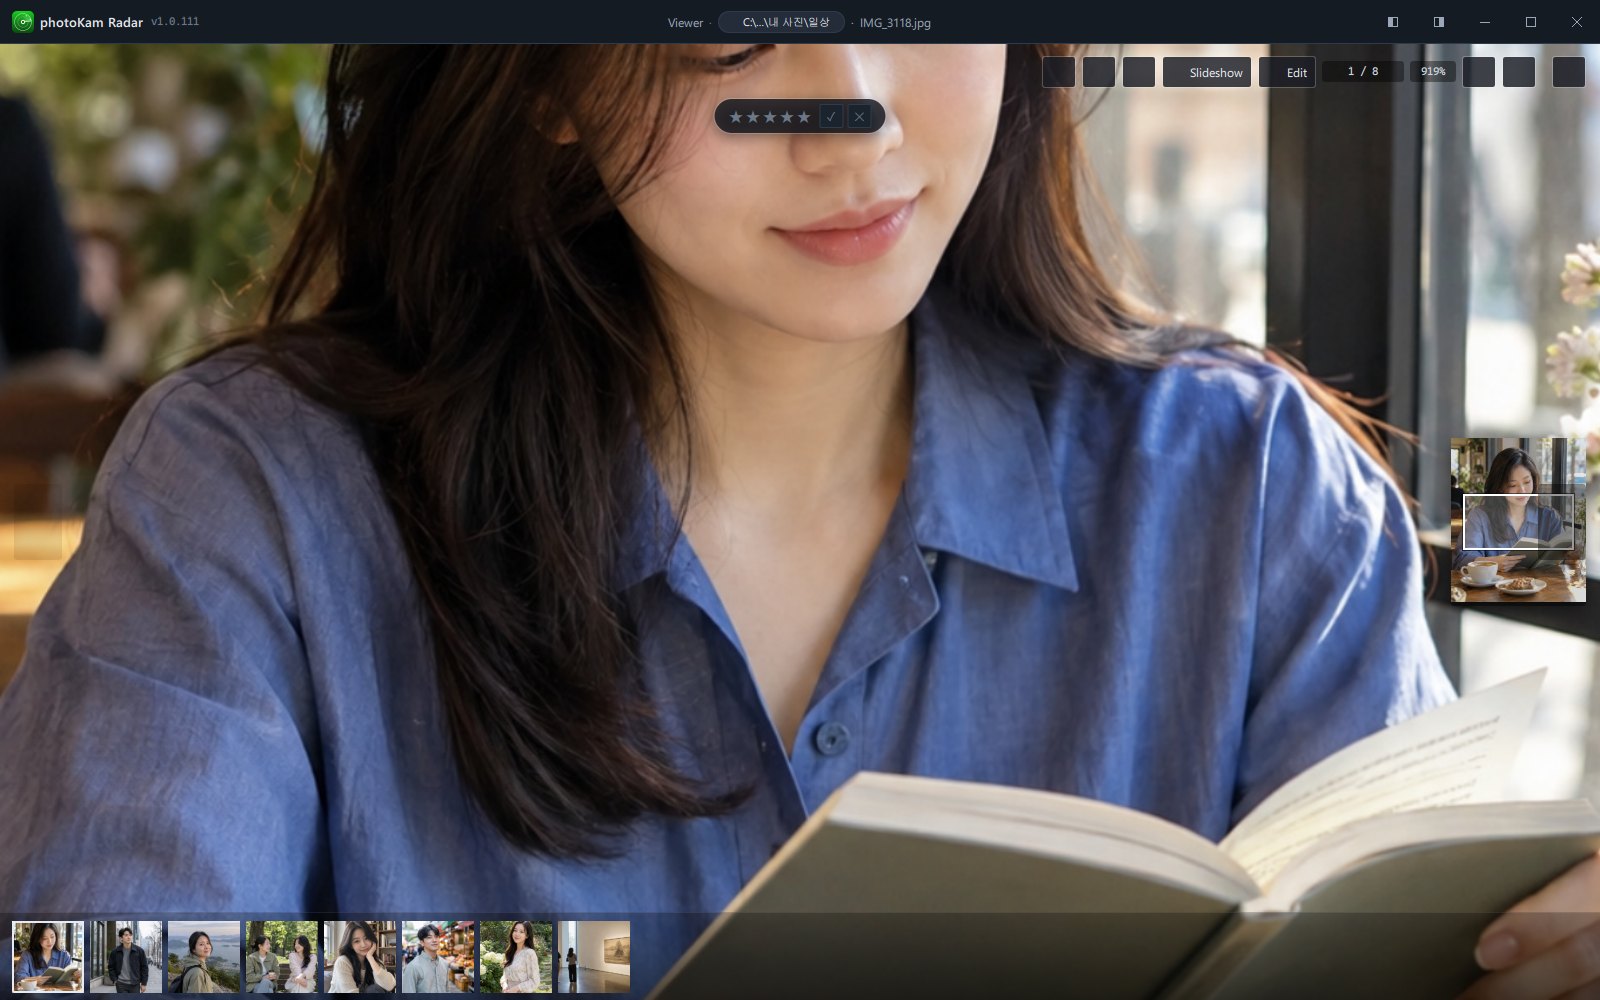
| Action | What it does |
|---|---|
| Wheel | Zooms in · out around the mouse position. 1× to 16× the size fitted to the screen |
| Double-click | Switches between fit ↔ 2.5× |
| Drag (while zoomed in) | Moves the photo (hand cursor) |
| Drag (at fit size) | Drags the file out. Drop it into a File Explorer folder, a messenger or another program's window to copy it |
| Click · drag on the minimap | While zoomed in, moves the visible area (white rectangle) to that position on the small full image at the middle right |
| Right-click | Opens the menu (see below) |
| Click on empty space | The full view stays open (so it doesn't close by accident) |
Filmstrip at the bottom
| Item | Details |
|---|---|
| Photos shown | Photos in the same folder as the photo you opened (only photos directly in that folder). When opened from the gallery, it follows the gallery's type and Group pairs settings; when opened from the map, it shows all files in that folder |
| Order | By file name (numbers in numeric order, for example IMG_2 before IMG_10) |
| Current photo | Shown with an accent-colored border, and smoothly moves to the center each time you flip |
| Click | Goes to that photo |
| Wheel | Scrolls the strip sideways (stops at the end) |
| Hover | Shows the file name |
| Marks | ▶ for videos; edited photos show edited thumbnails |
Inspector panel (right column, Tab / H)
| Item | Details |
|---|---|
| Histogram | Choose RGB · Luminance. If the distribution piles up at either end, a white triangle appears in the corner (shadows are crushed · highlights are blown out to white) |
| File name | |
| Information | Shown by group: File (size · dimensions · format · duration) · Captured (date taken) · Camera (camera · lens) · Exposure (aperture · shutter · ISO · focal length · 35mm equivalent · exposure compensation · metering · white balance · flash) · Location (GPS) · Storage (path · modified · indexed). Each row has a small icon, and only rows with a value are shown |
| Map | A small map + Expand (map window), only when there's location data |
| Rating · flag | At the bottom |
With the panel off, press I to see the same information in a panel floating at the top right of the photo.
Right-click menu
| Item | What it does |
|---|---|
| 📋 Copy | Copies this file to the clipboard. Paste it into File Explorer to copy the file ("N copied") |
| 📂 Open folder | Opens the folder containing this file in File Explorer |
| ✎ Edit | Goes to the editor inside the app (photos only) |
| ↗ Open in external editor | Opens the photo in the external editor set in Settings (the Windows default app if none is set) |
| ↻ Rotate 90° | Rotates 90° clockwise. Saved as an edit; the original file stays as it is (photos only) |
| 🗑 Move to Recycle Bin | Sends the file to the Recycle Bin after confirmation. After deletion, the next photo is shown (if it was the last one, the full view closes) |
Focus point (F)
| Mark | Meaning |
|---|---|
| Yellow rectangle | Where the camera chose to focus (AF point) |
| Green rectangle | Where the camera recorded that focus was achieved |
| "No focus data in this photo" | A photo taken with another camera, or one whose focus record was lost (see the supported cameras below) |
- Supported cameras: Canon R series, newer Sony models, Olympus, Panasonic (the app reads the manufacturer's records in the file). Hover over the button to see which manufacturer's record is used.
- Whether it's on or off is saved on this PC and carries over to the next photo and the next session.
- For photos cropped or rotated in the editor, the focus rectangles move to match the changed position.
Overexposure warning
- When on, it covers the areas blown out to white (that reached the brightest value) with stripes. The percentage of the blown-out area is shown on the button and in the tooltip.
- It stays on for the next photos until you turn it off.
Slideshow
Starting from the photo you're currently viewing, the list in the filmstrip at the bottom plays full screen. When it reaches the end, it goes back to the beginning and continues; videos and unreadable files are skipped.
Control bar (bottom center of the screen — appears when you move the mouse and hides after 2.5 seconds)
| Button | What it does |
|---|---|
| ⏮ · ⏭ | Previous photo (←) · Next photo (→) |
| Large button in the middle | Play (Space) / Pause (Space). Pausing also pauses the music |
n / N | Which photo you're on |
| Track name (three moving bars mean it's playing) | Click to open the Track list. Built-in music (AI) or My music · N tracks is shown at the top, and the current track is marked with ♪ |
| Small ⏭ | Next track (N) |
| Speaker icon | Music on/off. If you turn it off, it starts off next time too |
| Volume slider | Music volume (saved, default 60%) |
| ⚙ | Opens the Slideshow settings window |
| ✕ | End (Esc) |
| Thin line under the control bar | Time left until the next photo |
Click the photo to switch between pause and play.
Slideshow settings (⚙ — the slides keep advancing while the settings window is open, so you can see the effect you choose right away. Your choices are saved)
| Name | Options | Default | What it does |
|---|---|---|---|
| Advance every | 3 s · 5 s · 10 s | 5 s | How long each photo is shown |
| Effect | Random · Fade · Slide · Slow zoom · Cut | Random | How photos change. Random alternates between fade, slide sideways, slide up, slow zoom in, slow zoom out and grow in (never the same effect twice in a row). With Slide, the next photo comes in from the right and the previous photo from the left |
| Transition time | 0.5 s · 1 s · 2 s | 1 s | How long the change between photos takes |
| Play music | On / off | On | |
| Music source | Built-in music (AI) · My music | Built-in music | Built-in music plays the AI music included with the app in random order |
| Choose files… · Choose folder… | Your own music files (mp3 · m4a · aac · wav · flac · ogg · opus · wma) or a folder | — | Once chosen, it switches to My music and plays right away, and starts with that music next time too |
The music fades in over 2 seconds when the slideshow starts and fades out when it ends. If the music files you chose are gone, the built-in music plays.
Step by step
A. Choosing the shot that's in focus
- Open
Double-click the first shot in the gallery.
- Turn on the focus display
Press F. The green rectangle is where focus was achieved.
- Zoom in
Turn the wheel over the green rectangle to zoom in, or double-click to view at 2.5×. Move the viewing position with the minimap at the middle right.
- Flip and compare
Go to the next shot with →. The zoom starts again from the fit-to-screen size for each shot.
- Mark
Press P (pick) or 5 (★5) on a shot you like, and X on one you don't.
B. Flipping through RAW only
- Open a photo from a folder containing both RAW and JPG in the full view. All · RAW · JPG appear at the top left.
- Click RAW. The JPG you were viewing changes to the RAW with the same name, and only RAW files remain in the filmstrip at the bottom.
- Click Edit to open the editor with the RAW file. Choose All again to go back to the same display as the gallery.
C. Checking areas blown out to white
- Click the overexposure warning button (half-filled circle).
- The striped areas are blown out to white, and their percentage is shown on the button.
- In the editor, lower Highlights · Whites and see whether the blown-out areas can be recovered (Light).
D. Watching a slideshow with music
- In the full view, press S (or click Slideshow). The screen switches to full screen and the built-in music fades in.
- Move the mouse to show the control bar, then choose the values you want with ⚙, such as Advance every
3 sand Effect Fade. - To use your own music, choose your music folder with ⚙ → Choose folder….
- Pause with Space and end with Esc. You return to the full view, showing the last photo you viewed.
E. Sending a photo to another program
- In the full view, make sure the photo is at the fit-to-screen size (if you're zoomed in, double-click to return to fit).
- Drag the photo and drop it into a File Explorer folder or another program's window. The file is copied.
- Or press Ctrl+C and then Ctrl+V in File Explorer.
Result
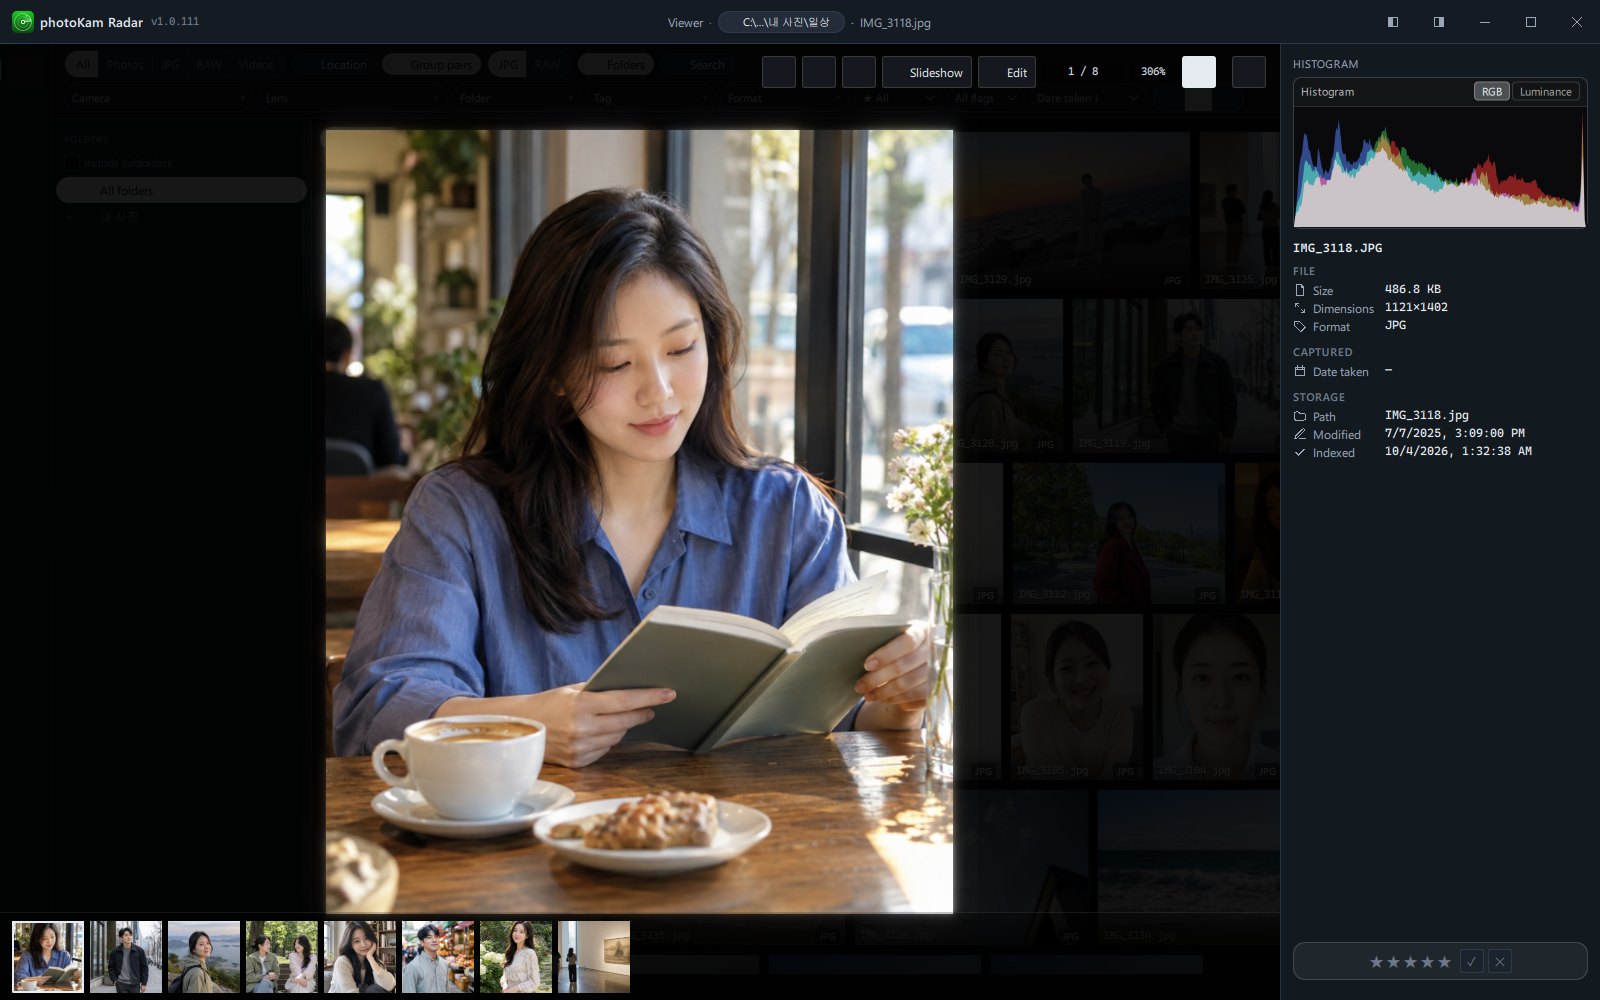
Ratings and flags you give in the full view are saved immediately and also show in the gallery. When you close the full view, you return to where you were in the gallery. When you close the editor and come back, "Applying edits…" is shown briefly until saving is done, and then the image changes to the edited version.
Keyboard shortcuts
| Where | Key | What it does |
|---|---|---|
| Full view | ← · → · PgUp · PgDn | Previous · next photo (on a video: Shift+← · Shift+→ · PgUp · PgDn) |
| Full view | 1 ~ 5 · 0 | Rating · clear rating |
| Full view | P · X · U | Pick · reject · clear flag |
| Full view | F | Focus point on · off (full screen on a video) |
| Full view | Tab · H | Inspector panel on · off |
| Full view | I | Floating info panel |
| Full view | S | Slideshow (with 2 or more photos) |
| Full view | Delete | Move to the Recycle Bin (after confirmation) |
| Full view | Ctrl+C | Copy this file to the clipboard |
| Full view | Esc | Close |
| Slideshow | Space | Pause · play |
| Slideshow | ← · → · PgUp · PgDn | Previous · next photo |
| Slideshow | N · P | Next track · previous track |
| Slideshow | Esc | Closes the track list or the settings window first if open; otherwise ends the slideshow |
In the macOS version, use ⌘ (Command) instead of Ctrl (for example, ⌘+C).
Good to know
The zoom % is based on the original pixels. At 100%, one pixel of the photo is shown as one pixel on the screen. To check focus accurately, zoom in to around 100%.
If you close the full view with the inspector panel on, it opens with the panel on next time too. When you want to see the photo larger, turn the panel off with Tab and bring up the info panel with I only when you need it.
The first time you open a RAW file, "Converting the RAW original… (large files take a moment)" and a progress bar appear. Meanwhile, a blurred preview is shown first. When skimming quickly, switching to View: Camera preview is faster.
The filmstrip at the bottom works independently of the gallery's search conditions and shows the photos in the same folder as the photo you opened (following only the type and Group pairs settings). If a folder has more than 5,000 photos, only the first 5,000 by name go into the filmstrip.
Edit and Open in external editor are different. Edit keeps the original and saves only your edits. Open in external editor opens the original file in another program. Editing inside the app is available for JPG, PNG and RAW; for other formats (TIFF, WEBP and so on), clicking Edit opens the external editor.
The rotate button (↻) and Rotate 90° in the menu don't change the original file. The rotation is saved as the same edit as the 90° rotation on the Crop tab of the editor, so the photo appears rotated in the full view and thumbnails, and rotating four times returns it to its pre-edit state. You can change it again on the Crop tab of the editor or revert it with Reset to full frame · Reset all (Crop · Rotate). Formats such as BMP are rotated by saving the file itself again.
In the free version, a faint diagonal pattern (watermark) is also shown when you view edited photos (except photos that were only rotated 90°) in the full view or a slideshow (Free version · Full version). Unedited photos are shown as they are.
The slideshow's built-in music is included with the app.
Frequently asked questions
In the full view, the next photo isn't the next one in my search results but something unexpected.
The full view flips through photos within the same folder. To view only your search results in order, open the photos one by one from the gallery or use the compare screen.
I don't see All · RAW · JPG at the top left.
They're shown only in folders with a mix of RAW and photos in other formats.
RAW looks brighter than (or different from) the camera's screen.
View: RAW original converts the original data and matches it to how the camera rendered it. To see exactly the preview the camera stored, switch to View: Camera preview. The editor starts from the same look as the RAW original.
I turned on the focus display, but it says "No focus data in this photo".
The focus point is shown from the focus record that supported cameras (Canon R series, newer Sony models, Olympus, Panasonic) leave in the file. This message appears for photos taken with another camera, or whose focus record was lost when they went through another program.
Clicking outside the photo doesn't close it.
That's intentional, so it doesn't close by accident. Press Esc or click ✕ at the top right.
The slideshow button is dimmed and can't be clicked.
There's only one photo in the list. There must be two or more photos in the same folder.
I want to turn off the slideshow music.
Click the speaker button on the control bar, or turn off ⚙ → Play music. It stays off next time too.