Viewing and selecting photos
The gallery shows the photos and videos found on your PC in three ways: grid, tiles and list. Click a photo and its details appear on the right. If you rate photos (★ 1–5), mark them as picked (✓) · rejected (✕) and add tags, you can later gather just those photos with a filter. You can also select several photos at once and compare, rotate, copy or move them to the Recycle Bin right from the gallery.
When to use it
- When you skim hundreds of travel or event photos and pick out only the good ones (ratings, picks, rejects).
- When you want to compare two or three similar photos side by side.
- When you want to check a photo's shooting information (camera, lens, aperture, shutter, ISO, location).
- When you add tags to photos to gather them later.
- When you want to send selected photos to File Explorer or another program, copy or move them to a folder you've set up, or send them to the Recycle Bin.
Where to find it
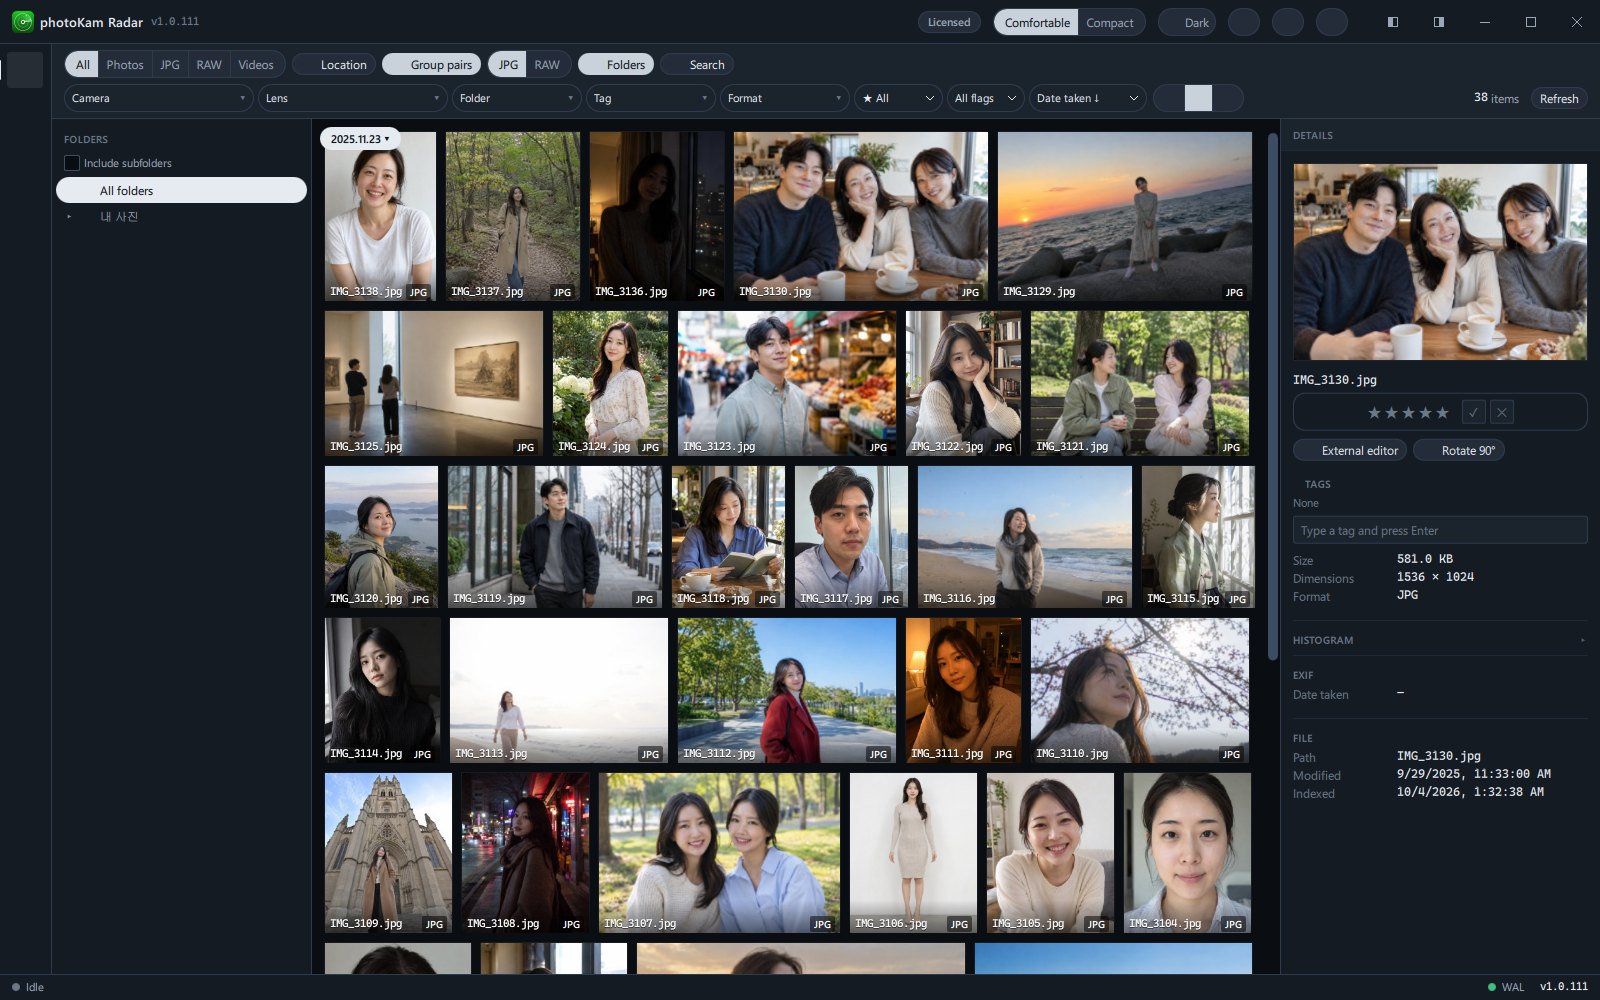
Gallery at the top of the left sidebar. It's the first screen you see when you start the app. Change the view with the three icons on the right of the toolbar (grid, tiles, list) or with Ctrl+1 · Ctrl+2 · Ctrl+3.
Buttons and menus
Three view modes
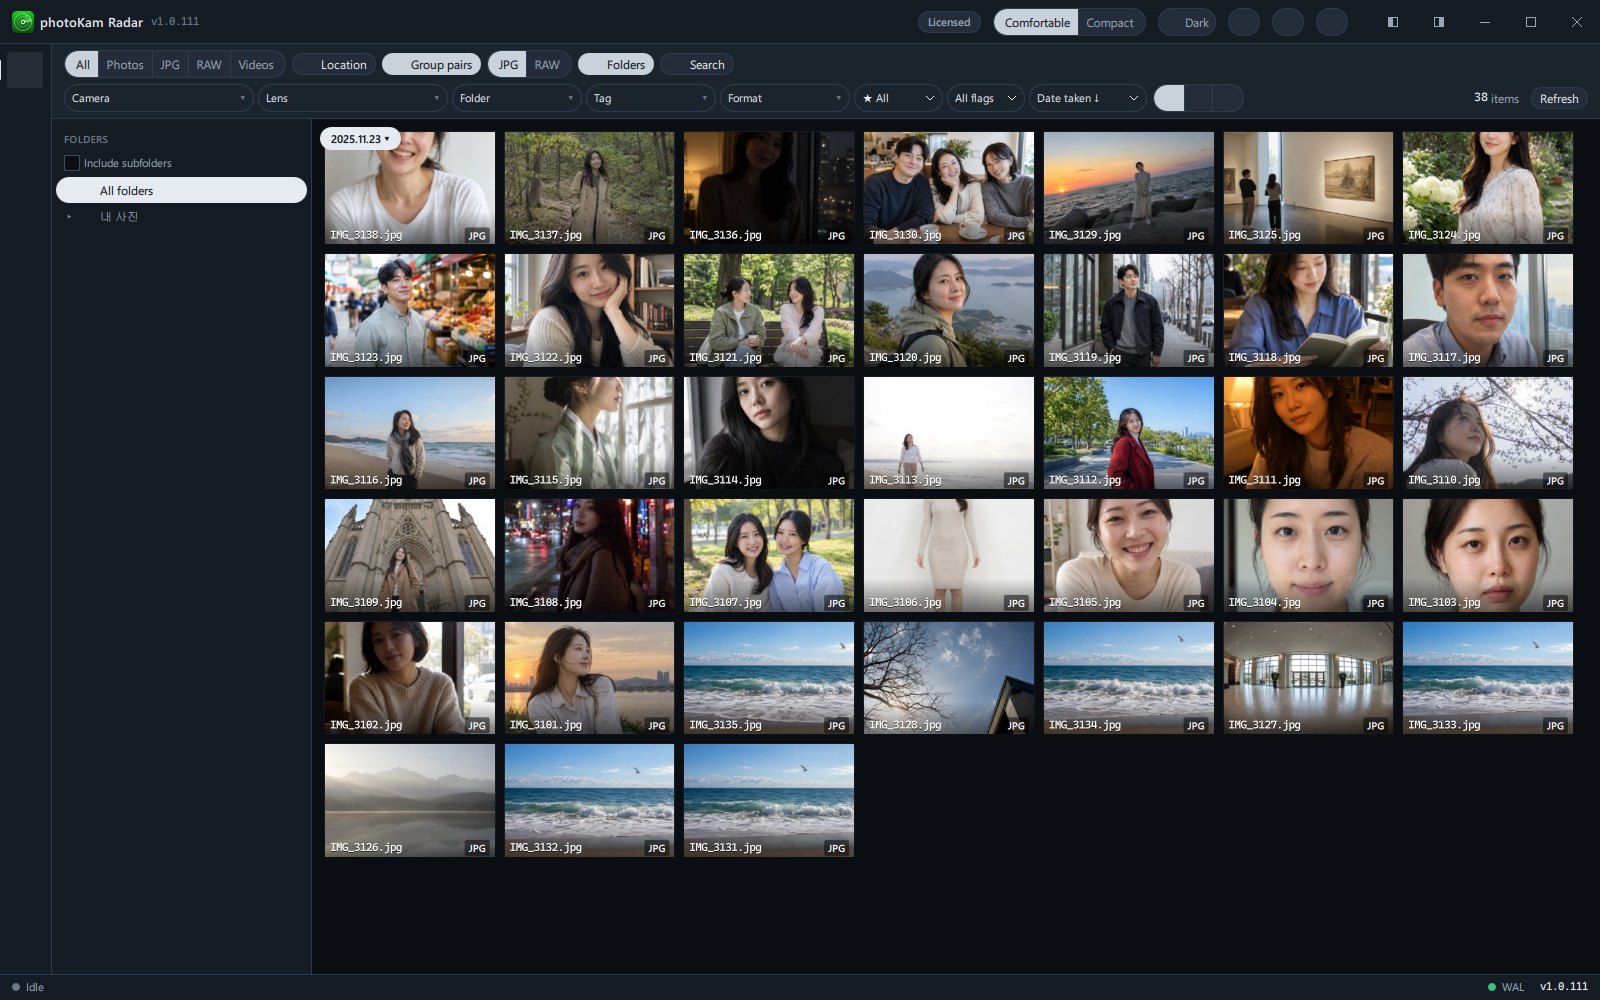
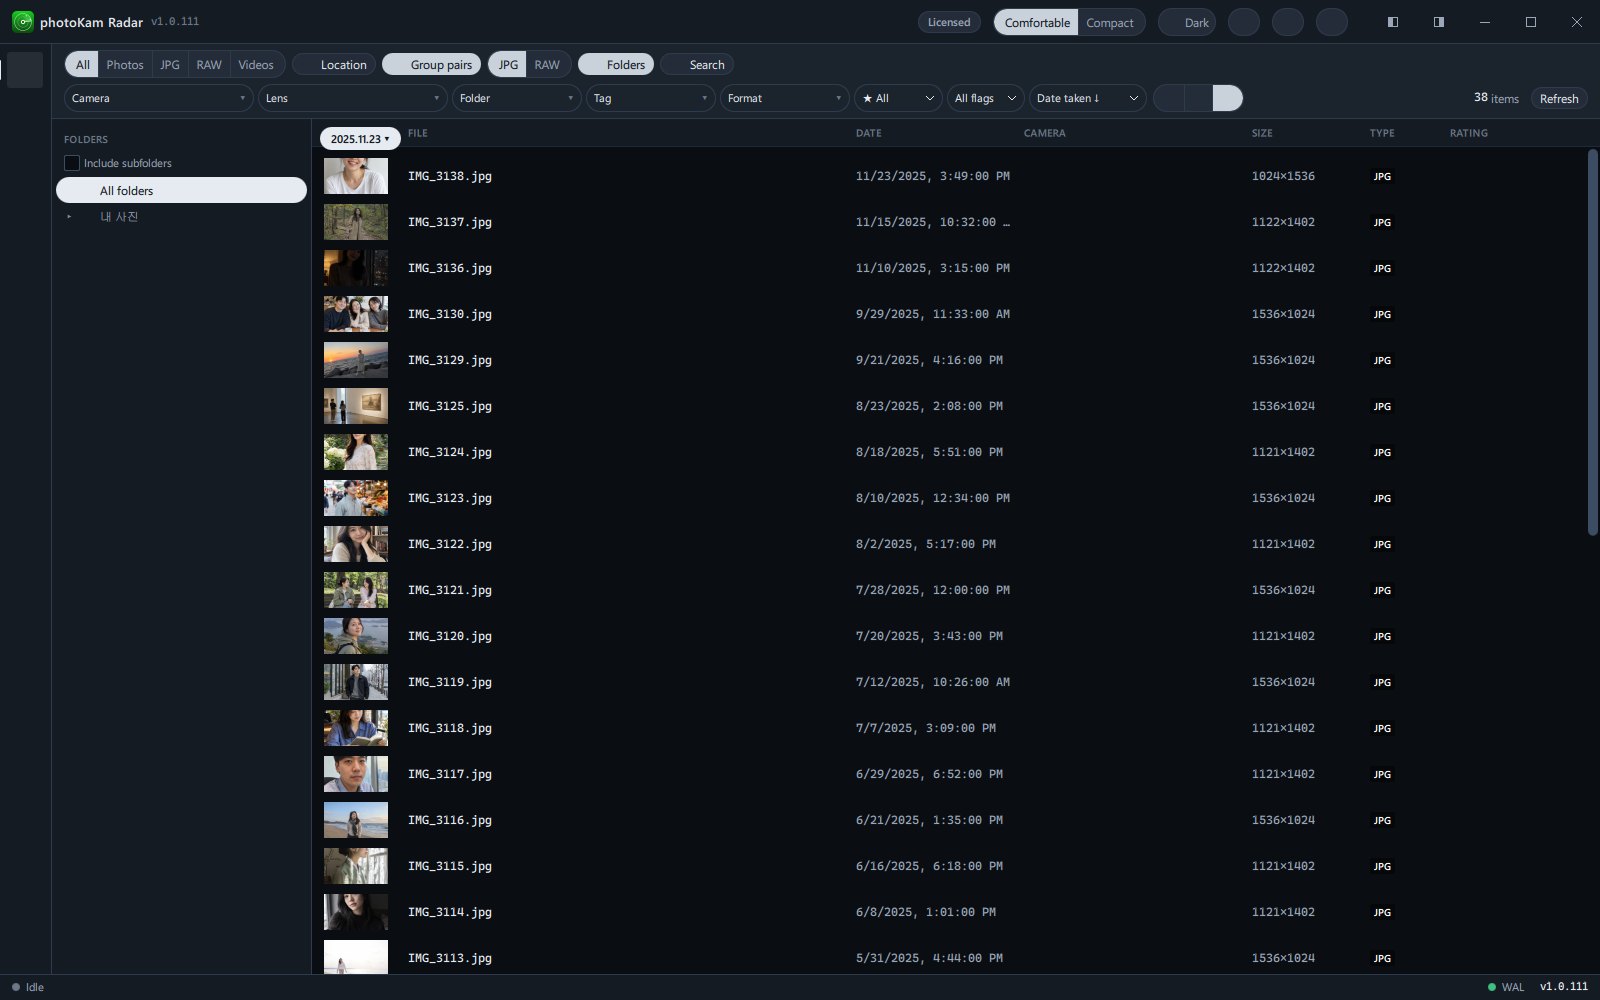
The people in the sample photos were generated by AI.
| View | Button tooltip (on hover) | Appearance | Best for |
|---|---|---|---|
| Grid | Uniform cells. Best for skimming fast (Ctrl+1) | Lines up photos in rows, filling 3:2 thumbnails edge to edge (the edges are cropped). Change the thumbnail size in Settings → Thumbnail size (120–260 px, default 168 px) | Flipping quickly through many photos, selecting several by dragging on empty space |
| Tiles | Rows filled at each photo's true ratio. Best for viewing (Ctrl+2) | Resizes photos without cropping, at their original ratio, so that both ends of each row line up exactly. "Reading photo ratios…" is shown briefly at first | A mix of landscape and portrait photos, viewing for enjoyment |
| List | File, date and camera in columns. Best for sorting and comparing (Ctrl+3) | Shows one photo per row, as a table | Comparing file names, dates and sizes |
The view you choose is saved and stays the same when you restart the app. Changing the view keeps your position near the selected photo.
Marks on thumbnails
| Position | Mark | Meaning |
|---|---|---|
| Bottom | File name + format badge (for example JPG, CR3, MP4) | When the RAW and JPG of the same shot are grouped, an accent-colored RAW+JPG badge is added |
| Bottom left | Yellow stars ★ | Number of stars given |
| Top right | Green ✓ / red ✕ circle icon | Picked / rejected |
| Top right | Red pin icon | Photo with location data (GPS) (Has location data) |
| Top left | Pencil icon | Photo edited in this app (Edited, including photos rotated 90°). The thumbnail also shows the edited result |
| Top left | A time such as 1:23 | Video duration |
| Center | ▶ in a circle | Video |
| Top left | Colored chip with the camera name | Shown only when you filter by two or more cameras (each camera always has the same color) |
| Top left | Red Gone + dimmed thumbnail | A file deleted from disk after the list was loaded. It leaves the list when you refresh |
| Center | Loading icon | Making thumbnail. The thumbnail appears after a moment |
| Center | ⃠ | Cannot make a thumbnail (the file is damaged or can't be read) |
| Whole thumbnail | Empty thumbnail with a soft shimmer | The photo at that position is still loading |
| Whole thumbnail | Shrinks slightly with an outer border, a glow and a ✓ at the top right | Selected thumbnail. Change the border color in Settings → Selection color |
Columns in list view
| Column | Contents |
|---|---|
| (Preview) | Small thumbnail. ▶ for videos |
| File | File name (+ RAW+JPG badge, Gone) |
| Date | Date and time taken |
| Camera | Camera name |
| Size | Width × height in pixels (duration for videos) |
| Type | Extension badge |
| Rating | Number of ★ |
| (Last column) | Picked ✓ / rejected ✕ icon |
A selected row gets a light background tint, and a vertical line in the selection color appears on its left edge.
Selecting
| Method | Result |
|---|---|
| Click | Selects only that photo and shows its details on the right |
| Ctrl + click | Adds a photo to or removes it from the selection, one at a time |
| Shift + click | Selects the range from the last photo you clicked to the one you click now (keep using Shift + click to widen or narrow the range) |
| Drag on empty space (grid view only) | Draws a rectangle and selects every photo inside it. Hold Ctrl or Shift while dragging to add to the current selection |
| Ctrl+A | Select the whole list |
| Esc | Clear the selection (also closes floating details) |
| Double-click · Enter | Opens the photo in the full view (Full view) |
The selection is cleared when the list conditions change because you change a filter or refresh.
Selection bar (appears at the right end of the toolbar when you select photos)
| Button | Shown when | What it does |
|---|---|---|
| N selected | Always | Number of selected photos |
| Compare | 2 or more | Opens the compare screen: side by side (2–4 photos) or reference compare (1 fixed + swapping candidates) |
| Rotate 90° | Always | Rotates the selected photos 90° clockwise. The original files stay as they are, and the rotation is saved as an edit (90° rotation). The thumbnails get the Edited mark and show the rotated photo (see "Good to know" below) |
| Paste edits | After copying edits | Applies the copied edits to the selected photos (Editor) |
| Organize ▾ | Always | ⧉ Copy · ➜ Move to folders you've set up. If no folder is set up, it says "Add a folder under Settings > Organize presets" |
| Move to Recycle Bin (red) | Always | Sends the photos to the Windows Recycle Bin after confirmation (shows Deleting… n/N for several photos) |
| Clear selection | Always | Clears the selection |
Details (appear on the right when you click a photo)
At first they open as a panel floating over the photo list; click the pin to dock them, and they become a column beside the list (the docked state is saved).
| Item | Contents · what it does |
|---|---|
| Top | Details · pin (Dock beside the grid (layer → column) / Undock (float over the grid)) · ✕ (Close) |
| Preview | Shows the photo at its original ratio. Click it to open the photo in the Full view |
| File name | |
| Rating · flag | Five ★ + ✓ pick · ✕ reject (see "Ratings and flags" below) |
| External editor | Opens the original in an external editor (set in Settings → Photo editor · Video editor; if left empty, the Windows default app is used) |
| Rotate 90° (photos) | The photo appears rotated immediately, and the rotation is saved in the background as an edit (90° rotation). The original file doesn't change. Even if you click quickly several times, the clicks are gathered and saved at once |
| 90° → Apply (videos) | Preview the rotation first; it's written to the file only when you click Apply (Video) |
| Tags | Tags are shown as chips (× = Remove). If there are no tags, it shows None. Type in the input box below and press Enter to add one |
| Size · Dimensions · Format | File size, width × height, extension |
| Histogram ▸ | Photos only. Click to expand and see the RGB / Luminance distribution (calculated only when expanded) |
| EXIF | Date taken · Camera · Lens · Aperture · Shutter · ISO · Focal length · 35mm equiv. · Exposure comp. · Metering · White balance · Flash (only items with a value are shown) |
| GPS | Latitude, longitude + Show location (map window, see Jump to date · Map) |
| File | Path · Modified · Indexed (when it was indexed) |
Ratings and flags
| Name | Range | Default | What it does |
|---|---|---|---|
| Rating | 0 – 5 | 0 | Click a star to give that many stars. Clicking the same star again sets it to 0. Hovering previews the stars in yellow |
| Pick ✓ | On / off | Off | Shown in green when on. Click again to clear it |
| Reject ✕ | On / off | Off | Shown in red when on. Click again to clear it (only one of pick and reject can be on) |
With the keyboard, the change applies to all selected photos at once: 1–5 rating, 0 clear rating, P pick, X reject, U clear flag.
Right-click menu
| Item | What it does |
|---|---|
| 📂 Open folder | Opens the folder containing the file in File Explorer, with that file selected |
| 🔍 Open full view | Opens the photo in the full view |
| 📋 Copy / Copy (N) | Copies the files to the clipboard (when you right-click a selected photo, all selected photos). Paste with Ctrl+V in File Explorer to copy the files |
| ✏ Rename | Renames the file (same as F2) |
| ✎ External editor | Opens the photo in an external editor |
| 🎨 Copy edits | Shown only for edited photos. Copies that photo's edits |
| 🎨 Paste edits (N) | Shown only after you've copied edits |
Right-clicking keeps the current selection.
Refresh button (far right of the toolbar)
While the gallery is open, it checks for changes every few seconds and tells you through the button text. So that the list doesn't jump while you scroll, changes are applied to the list only when you click the button.
| Button text | Meaning |
|---|---|
| Refresh | The list is up to date. Click to reload the list (F5) |
| N new photos · Refresh (accent color) | Newly found photos are available |
| N removed · Refresh (accent color) | Some photos were deleted (they stay dimmed for now) |
| N photos dated · Re-sort (accent color) | Some photos had their shooting date confirmed later. Click to re-sort in order of shooting date |
| Loading… | Loading the list |
To the left of the button is the number of photos in the current list (for example 12,345 items). If you've chosen a folder in the folder tree, that folder's chip (× = Clear folder) is also shown.
Compare screen
| Button · action | What it does |
|---|---|
| Side by side (default) | Shows up to the first 4 of the selected photos. 2 photos = 2 columns, 3 photos = 3 columns, 4 photos = 2×2 |
| Reference compare | Fixes 1 photo as the reference and compares it 1:1 with the others (all selected photos, even more than 4) as candidates you swap through. Each photo is labeled Reference · Candidate n / N |
| ‹ · › | Previous · next candidate (← · →) |
| Set as reference | Makes the current candidate the reference |
| ⟲ Reset (0) | Resets zoom and position (0) |
| ✕ | Close (Esc) |
| Wheel · drag · double-click | Zoom (1–16×), pan, switch between fit ↔ 2.5×. Applies to all photos together, so you can compare the same spot at the same magnification |
Step by step
A. Picking out only the good photos
- Choose a view
Switch to Ctrl+1 (grid) to skim quickly.
- Check large
Double-click photos you're unsure about to view them large. You can use 1–5 · P · X in the full view too.
- Mark
Click a photo in the gallery and press P (pick) or X (reject). Press 5 for photos you love.
- Gather
Change All flags in the toolbar's quick filters to Picked, or set the rating filter to 4★ and up (Search and filters).
B. Rating several photos at once
- Click the first photo, then hold Shift and click the last one (in grid view, you can also drag on empty space).
- When N selected appears on the right of the toolbar, press 3. All selected photos get ★3.
C. Adding tags
- Click a photo. Its details appear on the right.
- In the input box under Tags ("Type a tag and press Enter"), type something like
family-tripand press Enter. - The tag is added as a chip. To delete it, click the × on the chip.
- Later, choose it under Tag in the toolbar's quick filters to gather those photos.
D. Docking the details beside the list
- Click a photo and the details open as a panel floating over the list.
- Click the pin at the top and they become a column beside the list; the photo list gets narrower by that much.
- Click the pin again or click ✕ to go back.
E. Sending selected photos to File Explorer
- Select photos and press Ctrl+C (or right-click → Copy (N)). "N copied — paste into a folder (Ctrl+V)" appears.
- Press Ctrl+V in the folder you want in File Explorer to copy the files.
- You can also drag thumbnails straight into File Explorer, a messenger or another program's window to copy them (dragging a selected thumbnail drags all selected photos).
F. Copying · moving to a folder you've set up
- First, register the folders you use often with Settings → Organize presets → Add folder.
- Select photos in the gallery and click Organize ▾.
- Click ⧉ Copy or ➜ Move on the row of the folder you want, and a confirmation such as "Copy N items to the 'XX' folder?" appears. Confirm it, and when the task finishes, "N copied" is shown.
G. Sending photos to the Recycle Bin
- Select photos and press Delete (or click Move to Recycle Bin).
- In the "Move N photos to the Recycle Bin?" window, click Move to Recycle Bin.
- For several photos, Moving to the Recycle Bin… n/N and a progress bar appear at the bottom center of the screen, and when it's done, "Moved N to the Recycle Bin." is shown.
- To undo, restore the files from the Windows Recycle Bin.
H. Renaming a file
- Click a photo and press F2 (or right-click → Rename).
- Type the new name in the Rename window. If you leave out the extension, the original extension is kept.
- Click Rename and "Renamed to "new name"." appears.
I. Comparing two photos
- Select 2–4 photos to compare.
- Click Compare. Compare appears in the top bar and the photos are shown side by side.
- Zoom in on one photo with the wheel and the other photos zoom in together, to the same spot at the same magnification. This is handy for comparing focus or camera shake.
- Close with Esc.
Result
Ratings, flags and tags are saved immediately and show the same values everywhere: thumbnails, the list, the full view and the details.
Keyboard shortcuts
| Key | What it does |
|---|---|
| Ctrl+1 · Ctrl+2 · Ctrl+3 | Grid · tiles · list |
| 1 ~ 5 · 0 | Rate selected photos · clear rating |
| P · X · U | Pick · reject · clear flag |
| Ctrl+A | Select all |
| Esc | Close the date window → close floating details · clear selection |
| Enter · double-click | Full view |
| Delete | Move to the Recycle Bin (after confirmation) |
| F2 | Rename |
| Ctrl+C | Copy the selected files to the clipboard (for pasting into File Explorer) |
| Ctrl+Shift+C · Ctrl+Shift+V | Copy edits (current photo) · paste edits to the selected photos |
| F5 | Reload the list |
| Ctrl+G | Jump-to-date window (Jump to date · Map) |
In the macOS version, use ⌘ (Command) instead of Ctrl (for example, ⌘+1, ⌘ + click).
Good to know
It helps to use ratings for "how good is it" and flags for "use it or not". For example, first quickly mark only the rejects with X, then set the flag filter to Rejected to gather them and send them to the Recycle Bin.
Change the grid's thumbnail size in Settings → Thumbnail size, and the height of rows and buttons with Comfortable · Compact in the top bar. Change how far one notch of the wheel scrolls in Settings → Scroll speed (50–300%).
The vertical scroll bar on the right is always visible and can be dragged. When sorted by shooting date, the date button at the top left shows the date of the photo currently at the top.
External editor in the details opens the original in another program (an external editor). To edit inside photoKam Radar without changing the original, use Edit in the full view (Editor).
Rotate 90° (selection bar, details, full view) doesn't change the original file. The rotation is saved as an edit, the photo gets the Edited mark, and it appears rotated in thumbnails and the full view. If you rotate four times and return to the original orientation, the photo returns to its pre-edit state.
It's the same value as the 90° rotation on the Crop tab of the editor, so you can change it there again or revert it with Reset to full frame · Reset all (Crop · Rotate). Other programs show the photo as it was before rotating, so if you need a rotated file, create a new file with Export.
Formats such as BMP are rotated by saving the file itself again. Videos are rotated with 90° → Apply in the details (Video).
Rename · Move to Recycle Bin · moving with Organize ▾ change the actual files (file operations you choose yourself). Files sent to the Recycle Bin can be restored from the Windows Recycle Bin. Moved files leave the list until they're indexed again at their new location.
Selecting several photos by dragging on empty space works only in grid view. In tiles and list view, use Shift · Ctrl + click.
If you copy files from another folder in File Explorer and press Ctrl+V in the gallery, the files are copied to the top of the first drive · folder that is switched on in the Volumes screen, and photo scanning starts again ("N imported → folder name · Scanning…"). The original files stay where they are.
Frequently asked questions
Every time I click a photo, a panel pops up on the right and covers the screen.
Click an empty space (grid view) or press Esc to close it. If you always want it beside the list, click the pin to dock it as a column beside the list. Then it won't cover the list.
I clicked a star and the rating became 0.
Clicking the star you already gave clears the rating (0). Clicking a different star changes it to that number.
Pressing 5 doesn't rate the photo.
Keyboard ratings apply to selected photos. Click a photo first. If you're on another screen such as Settings or the map, go back to the gallery and press it there.
Are ratings and tags written to the photo files too?
No. They're stored only in photoKam Radar, and the original files don't change.
A thumbnail just keeps showing a loading icon.
The thumbnail is being created. Check in the status bar whether the work is resting (for example, while a full-screen app is running). The ⃠ mark means the file can't be read. You can see the error details on the Jobs screen.
A thumbnail is marked Gone.
It means the file was deleted from disk after the list was loaded. Click N removed · Refresh to remove it from the list.
The same photo appears twice, as JPG and RAW / appears only once.
Set this with Group pairs in the toolbar. When it's on, one shot is shown once (in the format you chose to show); when it's off, both are shown (Search and filters).