Editor overview
The editor shows one photo large so you can adjust its brightness, color and texture. It never changes the original file; only your edits are saved separately, and result files are created anew with Export. This page explains the screen layout and the features common to all panels (auto adjustment, undo, compare original and split view, versions, copying and pasting edits, and the filmstrip at the bottom).
When to use it
- When you want to make a photo look good in one step (Auto) and then adjust only the parts you need yourself.
- When you want to compare the result side by side with the photo before editing.
- When you want to save an edit you like under a name and try out several variations.
- When you want to apply the edits made for one photo to several photos taken the same day at once.
- When you want to edit one photo after another by flipping to the previous and next photo without leaving the editor.
Where to find it
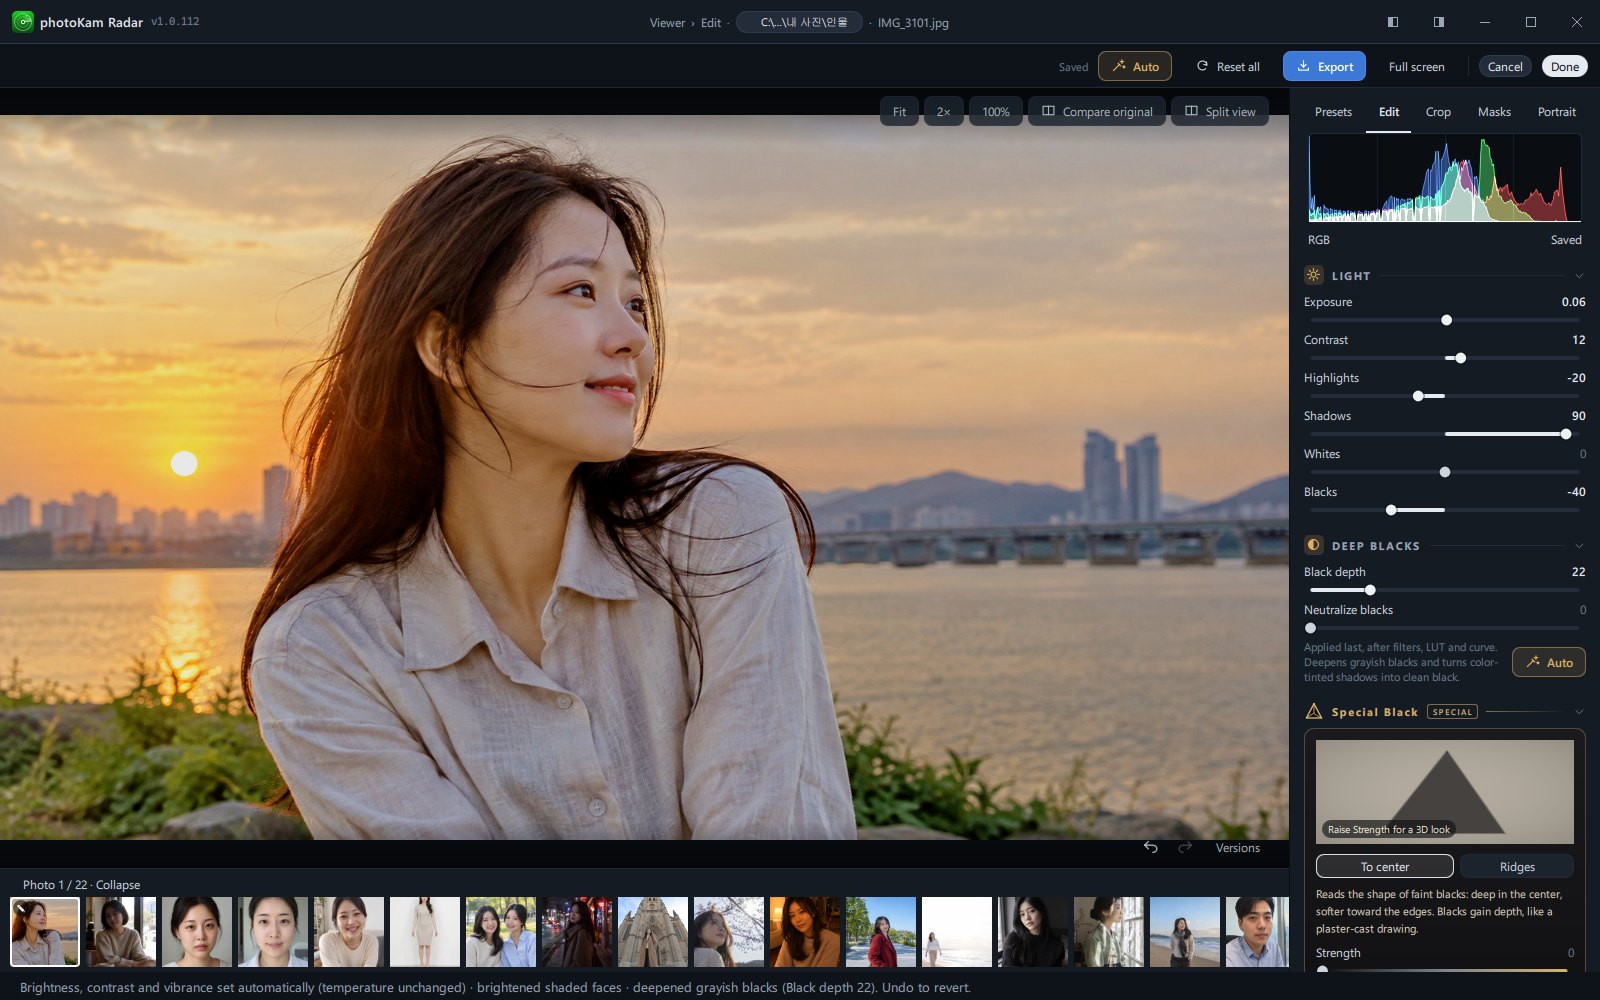
- In the Full view, click Edit in the tool bar at the top right (Edited for photos you've already edited).
- Or right-click the photo in the full view and choose ✎ Edit.
- The formats you can edit are JPG, PNG and RAW (CR2, CR3, ARW, NEF, DNG and so on). Other formats (TIFF, HEIC and so on) open in the external editor set in Settings.
- ✎ Edit in the right-click menu of the gallery opens an external editor, not this screen.
Screen layout and controls
Screen layout
| No. | Location | Contents |
|---|---|---|
| ① | Top bar | Save status · Auto · Reset all · Export · Full screen · Cancel · Done |
| ② | Photo (whole left side) | Shows the edited result immediately. Zoom in and out with the mouse wheel, and after zooming in, drag to move around |
| ③ | Buttons on the photo (top and bottom) | Top: Fit · 2× · 100% · Compare original · Split view / bottom right: undo · redo · Versions. They're overlaid semi-transparently on the photo and become solid when you hover over them |
| ④ | Right panel | 5 tabs: Presets · Edit · Crop · Masks · Portrait. When you open the editor, the Edit tab is selected |
| ⑤ | Filmstrip at the bottom | The same photo list as in the full view. Click to move to another photo, or select several photos to paste edits. It also has All · RAW · JPG buttons |
| ⑥ | Status bar at the bottom | Shows the result of what you just did (auto adjustment values, copy · paste, export complete and so on). After exporting, click this text to open the folder the file was saved to |
Top bar

| Name | What it does |
|---|---|
| Save status | Changes in the order Waiting to save… → Saving… → Saved. Edits are saved automatically a moment after you release a slider. If saving fails, Save error is shown and a Retry save button appears above the edit tab. |
| Auto | Automatically adjusts the photo's brightness, contrast and color (see "Auto" below). Analyzing… is shown while it calculates. |
| Reset all | Removes all edits, including the crop. It can be clicked only when there are edits, and can be undone. |
| Export | Opens the export window (→ Export). Saving… is shown while exporting. |
| Full screen / Windowed | Makes the editor fill the whole screen. Same as F11. |
| Cancel | Discards the changes made this time and closes (see "Cancelling and leaving" below). |
| Done | Saves your edits and returns to the full view. Same as Esc. Saving… is shown briefly while it closes. |
Buttons on the photo
| Name | What it does |
|---|---|
| Fit | Fits the whole photo on the screen. |
| 2× | Zooms in to twice the fit size. |
| 100% | Shows one pixel of the photo as one pixel on the screen. Clickable only when the photo is larger than the screen. Fine details such as sharpening, noise and fringes look exactly as in the exported file only at this zoom. |
| Compare original | While on, shows the whole original before cropping. Click it again (or press \) to return to the edited view. Turning it on turns off tools such as masks, repair and the eyedropper. |
| Split view | A vertical line appears in the middle of the photo, with Before on the left and After on the right. Drag the round handle on the line left and right to compare. You can also toggle it with Y. The before side also has the same crop, rotation, perspective and lens corrections applied. |
| Undo · redo (arrows at the bottom right) | Same as Ctrl+Z and Ctrl+Shift+Z respectively. |
| Versions (bottom right) | Opens Edit versions in the right panel (see "Versions" below). |
The Edit tab of the right panel
At the top are an RGB histogram of the current look and the save status; below them, the panels are arranged in the following order. Click a panel title to collapse or expand it.
| Panel | Initial state | Guide page |
|---|---|---|
| LIGHT | Expanded | Light |
| BLACKS | Expanded | Deep Blacks |
| TONE CURVE | Collapsed | Tone Curve |
| DETAIL | Expanded | Detail |
| LENS CORRECTIONS | Expanded | Lens Corrections |
| REPAIR | Collapsed | Repair · Effects |
| EFFECTS | Expanded | Repair · Effects |
| COLOR · COLOR MIXER · COLOR GRADING (collapsed) · COLOR TARGETS · LOOK (LUT) (collapsed) | — | Color |
At the bottom of the panel list are the Copy edits · Paste buttons, and below them the Undo · Redo · Reset buttons. This Reset keeps the crop, rotation, perspective and lens corrections and removes the rest of the edits (including masks, repair and portrait retouching). To remove everything including the crop, use Reset all in the top bar.
Filmstrip at the bottom
| Name | What it does |
|---|---|
| Photo n / N · Collapse (Expand) | Shows the position of the current photo in the list. Click to collapse or expand the filmstrip. |
| Thumbnails | Click to edit that photo (the photo you were editing is saved at that moment). The current photo has a white border, and edited photos have a ✎ mark at the top left. Formats that can't be edited are dimmed and can't be clicked. Scroll left and right with the mouse wheel. |
| Ctrl (or Shift) + click | Selects several photos (✓ mark at the top right). Adds photos to or removes them from the selection one at a time. |
| n selected · Paste edits to selected · Clear selection | Appear at the top right of the filmstrip when photos are selected (see "Pasting to several photos at once" below). |
| All · RAW · JPG | Shown only in folders with a mix of RAW and photos in other formats. RAW shows only RAW files, JPG only photos that aren't RAW (JPG, PNG, HEIC and so on), and All all photos. Switching moves you to the file in that format of the same shot (the pair with the same name) and continues the edit there. Your choice is remembered and linked to the same buttons in the full view. |
The filmstrip list is the same as the list you were viewing in the full view (same folder, same filters). The filmstrip appears when the list has two or more photos.
Using sliders (common to all panels)
- Drag the handle or click the slider to change the value. Where you can adjust, the mouse cursor changes to a left-right arrow.
- Dragging the slider name left and right also changes the value. Dragging about 300 pixels covers the whole range. Hold Shift while dragging to move 10× more finely for precise adjustments. This is handy when the slider is short.
- Double-click to return to the default (anywhere on the slider, the handle or the name). Most defaults are 0; Vignette midpoint is 50.
- Click the number box and the whole current value is selected, so you can type a new number right away. Press Enter to apply and Esc to cancel.
- When a value isn't 0, the number is shown in bold and the slider is filled with color from 0 to the handle, so you can see at a glance which sliders you've adjusted.
- Changes made during one drag are grouped into one undo step.
- Exceptions: the 4 sliders in Lens Corrections and Size in Repair are adjusted by dragging or clicking the slider.
Keyboard shortcuts
| Key | What it does |
|---|---|
| Ctrl+Z | Undo |
| Ctrl+Shift+Z (or Ctrl+Y) | Redo |
| Ctrl+Shift+C | Copy edits |
| Ctrl+Shift+V | Paste edits (to the photos selected in the filmstrip, if any) |
| Ctrl+→ · PgDn | Next photo in the filmstrip |
| Ctrl+← · PgUp | Previous photo in the filmstrip |
| Y | Split view on · off |
| \ | Compare original on · off (backslash; the ₩ key on a Korean keyboard) |
| F11 | Full screen on · off |
| Esc | Turns off the active tool (one at a time, in the order preset preview → eyedropper · repair tool → mask → crop). If no tool is active, same as Done (save and close) |
| Enter | Applies the crop on the crop screen |
| Mouse wheel | Zooms in · out around the mouse pointer |
Shortcuts work once you've finished typing in a number box. On the crop screen, use Cancel on the crop screen instead of undo, and move to the previous · next photo after you finish cropping. In the macOS version, use ⌘ (Command) instead of Ctrl (for example, ⌘+Z to undo, ⌘+Shift+Z to redo).
Step by step
The basic flow
- Open the editor
Click Edit in the full view. The Edit tab opens in the right panel.
- Click Auto
It's in the top bar. Analyzing… is shown for a moment, then the values in the Light panel are filled in, and the status bar shows what was adjusted.
- Adjust only the parts you don't like
Work your way down from the Light panel, dragging sliders or typing numbers.
- Compare
Press Y (split view) and drag the center line, or press \ (compare original) to switch back and forth with the original.
- Done
Or press Esc. Your edits are saved and you return to the full view. The gallery thumbnail also changes to the edited look and gets a ✎ mark.
- Export if you need a file
Creates a new file with the edited look (→ Export).
Auto
- Click Auto in the top bar. While it calculates, wait without moving other sliders (if you change values in the meantime, the auto result is discarded).
- What auto adjustment changes:
- Exposure — Moves the photo's midtone brightness toward a proper level, but not all the way, so the mood of photos you deliberately shot dark is kept. It never raises exposure so far that bright areas blow out to white, and lowers exposure only slightly, and only for photos with large blown-out areas.
- Whites is only raised and Blacks only lowered, widening the tonal range (blacks are never lifted to gray).
- Contrast is raised slightly by default, and more for flat photos.
- Highlights · Shadows are adjusted only for photos with large areas blown out to white or crushed to black.
- If there are people, it measures face brightness and brightens shaded faces (mainly with Shadows, raising exposure only slightly). Face detection is processed only on this PC.
- Vibrance is raised more for photos with paler colors, and Saturation is raised just a little, only for pale photos.
- If the shooting ISO is 1600 or higher, a little Color noise is applied, and at 6400 or higher it suggests trying AI denoise (→ Detail).
- If blacks look gray because of a preset or LUT, Black depth is adjusted too (→ Deep Blacks).
- Temperature and tint are left as they are. To correct colors, click Auto color in the Color panel.
- Check the message in the status bar — for example: "Brightness, contrast and vibrance set automatically (temperature unchanged) · brightened shaded faces. Undo to revert." Depending on the photo, phrases such as "· portrait, so shadows lifted slightly", "· deepened grayish blacks (Black depth N)", "· color noise reduction N for ISO N" and "This photo is noisy. Try AI denoise in the Detail section" are added.
- If you don't like it, press Ctrl+Z once to go back to before the auto adjustment.
Compare original · split view
- Split view
Click Split view on the photo (or press Y). Drag the ◀▶ handle on the vertical center line to widen or narrow the Before area on the left. The line starts in the middle each time you turn it on.
- Compare original
Click Compare original on the photo (or press \). While on, it shows the original; when off, the edited look. Toggling it on and off with the key makes the difference easy to see.
Turning one of them on turns the other off.
Versions — saving the current edit under a name
- Click Versions at the bottom right of the photo. Edit versions opens in the right panel.
- Click Save current state…, type a name in the "Save current edit as a version" window (the default name is "Version <current time>") and click Save. The status bar shows "Saved the current edit as a version."
- Try out various changes.
- To go back to a saved state, click Versions, choose a version from the list and click Restore selected version. The status bar shows "Version restored: name". A restore can also be undone with Ctrl+Z.
- To go back to the edit panels, click the Edit tab at the top of the right panel.
Copying and pasting edits (one photo at a time)
- On the photo you've finished, click Copy edits (at the bottom of the Edit tab, or press Ctrl+Shift+C). The status bar shows "Copied the edits of filename."
- Click another photo in the filmstrip (or press Ctrl+→).
- Click Paste (or press Ctrl+Shift+V), choose the groups to bring over in the "Paste edits" window and click Paste:
- Light · Exposure, contrast, highlights/shadows, whites/blacks, curve — together with the DEEP BLACKS panel values (on by default)
- Color · Temperature, tint, vibrance, saturation, HSL, color targets — together with black & white and color grading (on)
- Effects · Vignette, grain, sharpening, noise, clarity — together with texture, dehaze, AI denoise and vignette midpoint (on)
- Crop · rotation (off) · Masks (off) — when you turn these on, the note "If the aspect ratios differ, crop and masks may land in a different place." appears.
- The status bar shows "Pasted the edits of …. Undo to revert." If the values are already the same, it shows "Nothing changed — these edits match the current ones."
Copied edits are kept until you close the app. In the gallery, too, you can right-click an edited photo and choose 🎨 Copy edits, then select several photos and use 🎨 Paste edits (→ Viewing and selecting photos).
Pasting to several photos at once (filmstrip)
- On the reference photo, click Copy edits.
- In the filmstrip at the bottom, select the photos to paste to with Ctrl+click (✓ mark). "n selected" appears at the top of the filmstrip.
- Click Paste edits to selected (or press Ctrl+Shift+V). When the window titled "Paste edits · n photos" opens, choose the groups and click Paste.
- "Pasting… n left" is shown at the top of the filmstrip, and when it's done, the status bar shows "Pasted edits to n photos. To revert, open a photo and reset it." The thumbnails get a ✎ mark.
- To clear the selection, click Clear selection.
All · RAW · JPG
- When you edit in a folder containing both RAW and JPG, the All · RAW · JPG buttons appear at the top of the filmstrip.
- Click RAW and only RAW files remain in the filmstrip, and the JPG you were editing changes to the RAW with the same name so you can continue editing (the JPG's edits are saved at that moment).
- Your choice is remembered and stays the same the next time you open the full view or the editor. In folders without that format, all photos are shown.
Cancelling and leaving
- Click Cancel in the top bar.
- If you've made changes, the "Discard edits?" window opens — "All changes made in the editor this time will be discarded, returning the photo to how it was before you opened it. Saved versions and exported files are kept."
- Click Discard & close to revert the changes and close, or Keep editing to return to the editor. If you haven't made any changes, it closes right away without asking.
Result
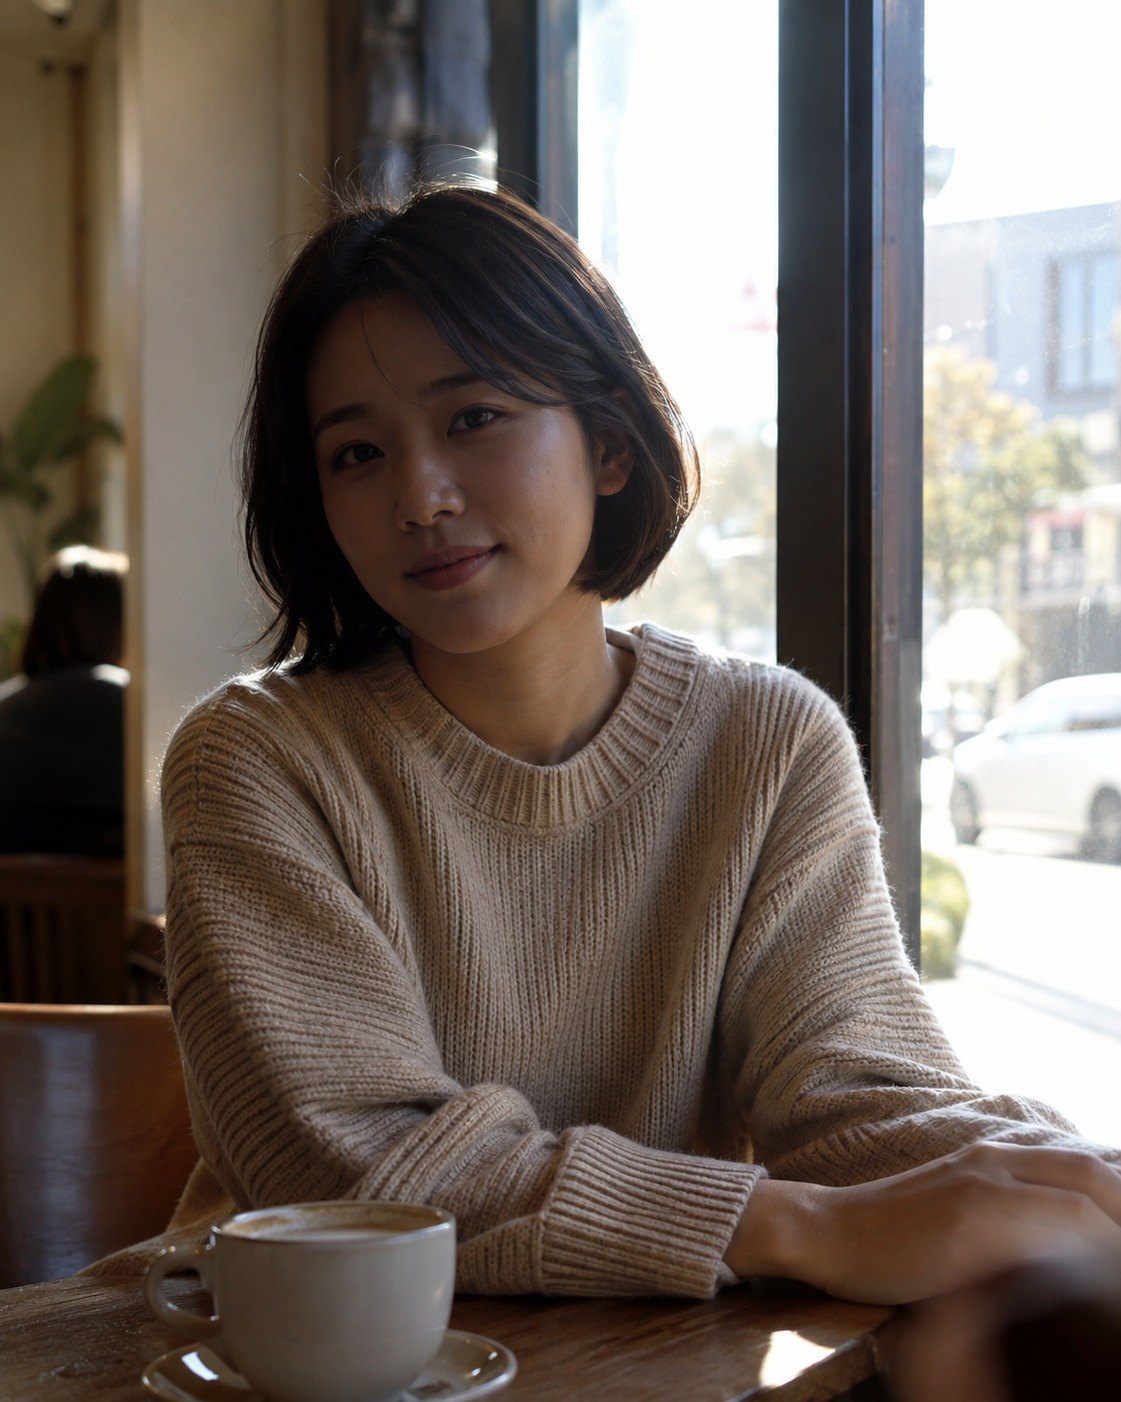
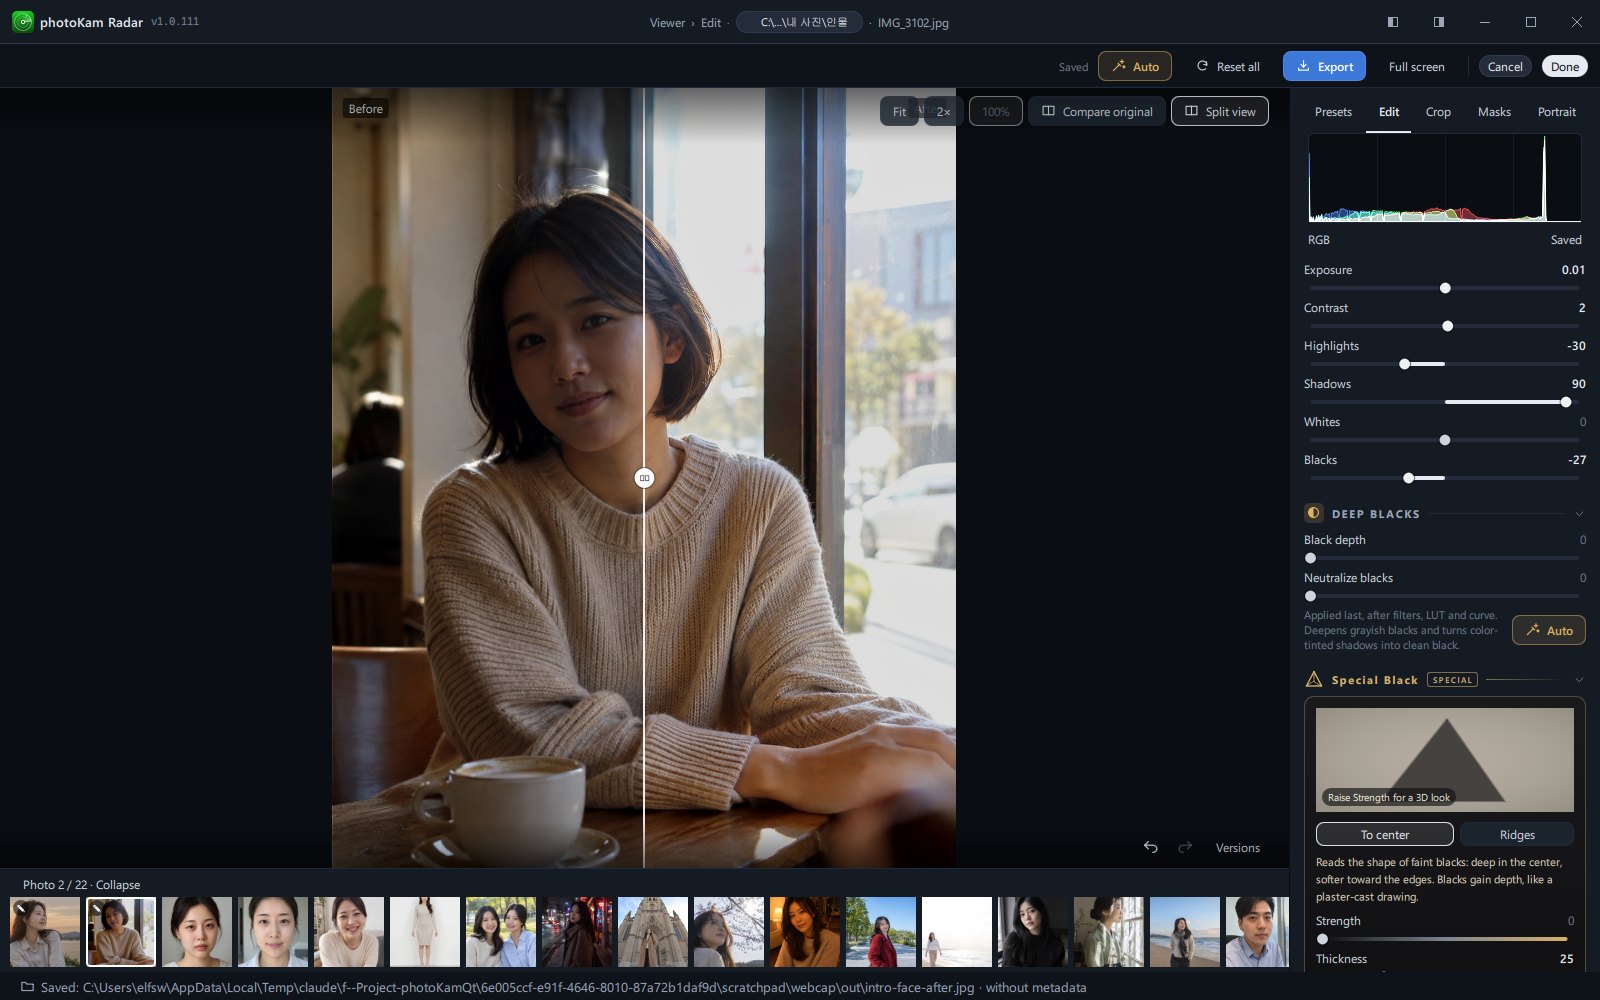
 BeforeAfter
For this photo, the values set by auto adjustment are exposure +0.01, contrast +2, highlights −30, shadows +90, blacks −27 and vibrance +21, and the status bar shows "Brightness, contrast and vibrance set automatically (temperature unchanged) · brightened shaded faces. Undo to revert."
With one auto adjustment, the shaded face becomes brighter and the whole photo becomes clearer, without the view outside the window blowing out to white.
The people in the sample photos were generated by AI.
Good to know
Edits are saved separately and the original file never changes at all. Result files are created only with Export.
Rotate 90° in the gallery, the full view and the details is also saved as an edit, and it's the same value as the 90° rotation on the Crop tab. When you open the editor, the photo appears rotated, and you can change it again on the Crop tab. Reset all in the top bar removes this rotation too, while Reset at the bottom of the Edit tab keeps it (→ Crop · Rotate).
The quickest way is to get the overall look with Auto and then refine it yourself. For photos shot with a dark mood, auto adjustment deliberately brightens them less.
When redrawing the screen takes more than 0.3 seconds, as with AI denoise or portrait retouching, Applying… is shown in the middle of the photo. Meanwhile the previous view stays visible until it changes to the new result.
When you zoom in a lot, the visible area is reread from the original and shown sharply. The maximum zoom is the larger of 8× the fit size and 100%.
Rather than adding to the current values, auto adjustment analyzes the original and sets new values for Exposure · Contrast · Highlights · Shadows · Whites · Blacks · Vibrance · Saturation · Black depth. If you click Auto after applying a preset, these values from the preset are replaced with auto values, while color work such as temperature, curves, color mixer, grading and LUT stays as it is.
You can undo up to 100 times on one photo. If you go to another photo with the filmstrip and come back, or close and reopen the editor, the earlier history is gone (your edits are saved). Save important stages with Versions.
If you edited several photos by moving between them with the filmstrip, the photos you edited earlier were already saved when you moved on. Cancel reverts only the photo you're viewing now to how it was when you first opened it.
Only the photo you're currently editing can be reverted with undo. For other photos, you need to open the photo and Reset it, or paste again.
Copy edits carries the Light, Color, Effects, Crop · rotation and Masks groups. Lens corrections, perspective, repair (spot removal), portrait retouching and looks (LUT) are set per photo, so you adjust them on each photo.
the edit panels are dimmed, and the label below the histogram changes to "RGB · before applying". To adjust again, apply the preset or end the preview with Esc.
- In the free version, a faint diagonal "photoKam Radar · Free" watermark is added across exported photos, and the same watermark is previewed over the photo in the editor. Everyone can use all features in the same way (→ Free version · Full version).
Frequently asked questions
Does editing change the original file?
No. Only your edits are saved separately. If you need a result file, create a new file with Export.
There's no save button.
Changes are saved automatically a moment after you change a value. Check the Saved label in the top bar and below the histogram. Done is the button that saves and closes.
What's the difference between Done and Cancel?
Done saves the edits made so far and closes; Cancel discards the changes made since you opened this photo this time and closes.
Undo doesn't go back any further.
Undo history starts fresh each time you open a photo. To go back to an earlier state, restore a saved Versions entry, or Reset and adjust again.
I clicked Auto and the preset's look became weaker.
That's because auto adjustment reset the brightness, contrast, vibrance and saturation. Undo with Ctrl+Z, then apply Auto first and choose the preset afterward, or after applying a preset, try using only Auto in the Deep Blacks panel.
What's the difference between Compare original and Split view?
Compare original shows the whole original before cropping; split view shows before and after side by side on one screen, with the same crop and lens corrections.
Shortcuts don't work.
Shortcuts don't work while the cursor is in a number box. Click the photo once or finish entering the number with Enter. On the crop screen, use the undo and previous · next photo keys after you finish cropping.
How do I edit TIFF or HEIC photos?
On this screen you can edit JPG, PNG and RAW. Other formats open in the external editor set in Settings.